G10 Using G10 on a Fanuc Type Control

G10

I am always amazed that so many companies still don’t use G10 in their CNC programs. If you know you know.

I must admit I fuckin hate a lot of the things that young people say like “can I get a Latte”. (Get behind this fuckin counter and make it yoursef if you want to “get it”).

Anyway I kind of like “If you know you know”

No G10… Is this you?

I am sure you have your reasons which I will accept. But if your reason is that you don’t understand it then that’s just not good enough.

So you make a part, it’s all setup and you need to break it down.

If you can fix the work holding in such a way that you can reload it in exactly the same place then you need G10.

Let me explain, watch this video to see how single point location works.

G10 No need to spend loads of money.

You could just bolt a sub plate to your machine table so that vices and chucks etc can have dowels to locate them.

But the main idea is that you can relocate your work holding in exactly the same place every time.

G10
Using G10 on a Fanuc Type Control

This is your work offset page on a Fanuc control.

G10

These figures are written in by hand or by automatic setting.

If you had written this line in your program.

G90 G10 L2 P1 X-440.500 Y-265.200 Z-443.00

They would have been written in automatically when you ran the program.

So the work offset page could have any values in G54 but as soon as you run your program this G10 command will replace them with its preset values.

Make Sure Your in Absolute

Try not to forget the G90 (Absolute) because you may accidentally be in G91 (Incremental). What would then happen is it would add these numbers to what is already in the work offset. Oh dear me.

In G90 it will always replace them.

You can write to G54 G55 G56 G57 G58 or G59 just by changing the P number.

G90 G10 L2 P1 X-140.600 Y-265.923 Z-400.00 (G54)

G90 G10 L2 P2 X-125.500 Y-236.865 Z-313.865 (G55)

G90 G10 L2 P3 X-800.500 Y-563.200 Z-125.00 (G56)

G90 G10 L2 P4 X-440.500 Y-265.200 Z-169.369 (G57)

G90 G10 L2 P5 X-440.500 Y-265.200 Z-123.568 (G58)

G90 G10 L2 P6 X-410.500 Y-235.200 Z-443.00 (G59)

The code above would setup all six work offsets.

“Read More”

Learn CNC Canned Cycles G81 G84 G73

Learn CNC Programming (Canned Cycles)

Call David: 07834 858 407

CNC Training Centre Reviews

A Canned Cycle What is It?

If you want to learn CNC programming  then you need to know what a canned cycle is.

I’m going to have to be honest here it is a funny choice of words “Canned Cycle”. But a wild guess would be that all the information to drill a hole would be kept together in a “Can” ready to use.

In a Can…….Learn CNC

So let’s learn CNC Programming….

Make sure you read the end of this article to see a really cool way to drill equally spaced holes.

First of all we state the cycle:

G81 Z-20. R1. F100. X50. Y50. F200.

The machine will move to X50. Y50. then rapid to 1mm above the part (this is the R1.). It will then feed down to Z-20. at a feedrate of 200 mm per minute F200.

Finally it will rapid out of the hole.

It then sits ready for the next move.

dog-163527

All you need to do now is just keep giving positions.

G81 Z-20. R1. F100. X50. Y50. F200.
X60.
X70.
X80.
X90. Y60.
G80
The G80 at the end will cancel the canned cycle. It just means “Look I am a bit pissed off with drilling holes so can you stop”

So that’s it Canned Cycles it really is that easy you put all the information in the “Can” then each time you give a position you get another hole.

Want to know More?

Thought you would. You want to learn CNC programming don’t you?

There are loads of these canned cycle but I am not going to talk about every one in detail. No sorry you will have to read the boring old manual for that.

Not to Worry They Are All The Same

Well sort of. You state the cycle then it repeats at each position given until you cancel it (and that applies to all the cycles).

Anyway Here are a few:

G84 taps holes, tell it the pitch depth usual stuff.


G73 peck drilling is the same as drilling (G81) but you give it the peck depth.It pecks the hole breaking up the swarf.


G83 same as G73 but with each peck the drill comes right out of the hole. For deep holes or swarf that clogs.


G76 bores a hole, stops at the bottom, moves over and rapids out to avoid marking the bore.

Ok let me tell you this, you are doing great so far. This is how we learn CNC programming. Nice small steps.

G98 G99

I already wrote a post on this click to see it all (it’s truly amazing). I purposely didn’t include it in the cycle above which is ok. The idea was to keep it simple.

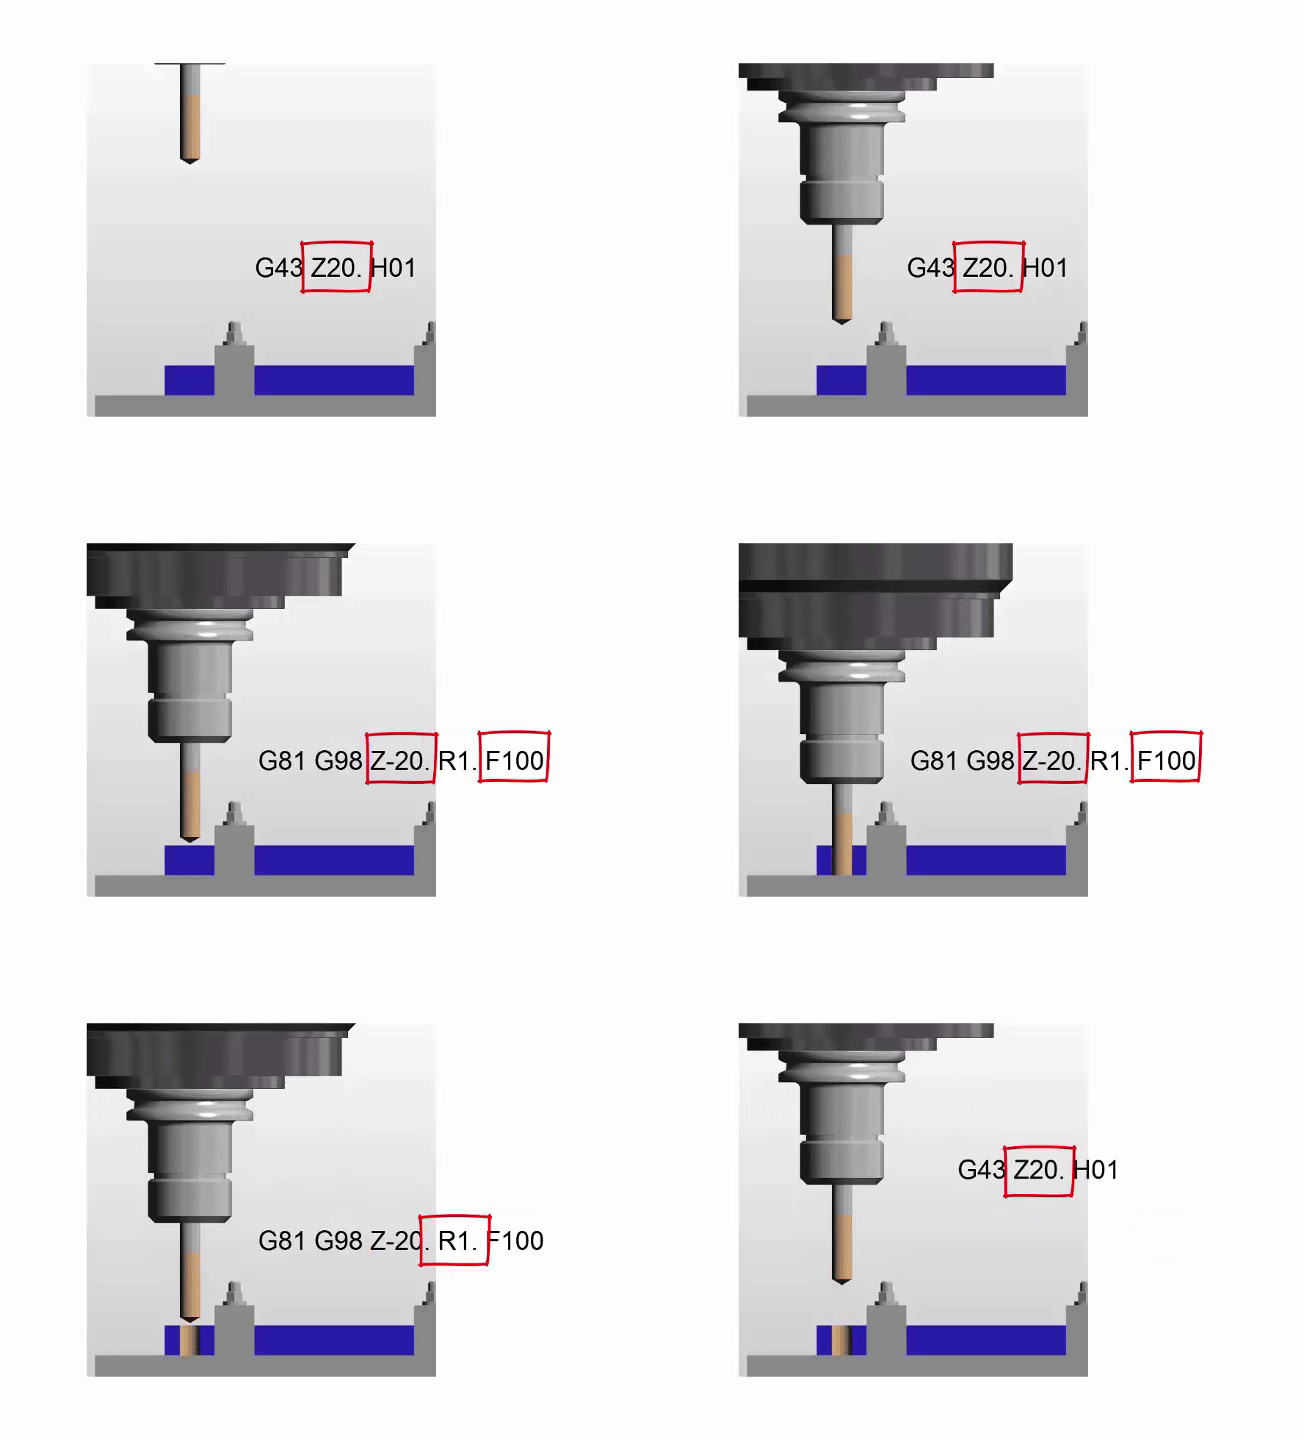
 G43 Z50.H1 M8

G81 G98 Z-20. R1. F100. X50. Y50. F200.
X60.
X70. G99
X80.
X85. G98
X90. Y60.
G80

g98gif

All it is in a nutshell. G98 returns to the Z point you were at before you started the canned cycle.

G99 will return to the R point (R1.)

Why you ask?

Easy you can jump over shit.

Clamps, high sections on a part, tall buildings, anything.

spiderman-1579249

It Gets Better.

G81 Z-20. R1. F100. X50. Y50. F200.

The Z-20. the R1. the feed-rate etc are all known as parameters. These are the things that control your cycle.

These can be altered at anytime and stay in until you alter them again or cancel the cycle.

G81 Z-20. R1. F100. X50. Y50. F200.
X60.
X70. Z-30. (From here onwards the holes are drilled 30mm deep not 20)
X80.
X90. Y60.
G80

Now let’s alter the feed

G81 Z-20. R1. F100. X50. Y50. F200.
X60. F300. (Change feed)
X70.
X80.F200.(Change it back)
X90. Y60.
G80

Remember it stays in until you say otherwise.

I Think you Now Need to Learn About Modal Information

Read the above article. Modal means that the information stays in the control until you cancel it or change it.

Do’s And Don’ts

Do Not………

Put in a rapid command G0 X50. Y50. it will cancel your cycle and the machine will just sit laughing at you. (No hole drilled).

See this post G0 cancels canned cycle.

G81 Z-20. R1. F100. X50. Y50. F200.
X60.
G0 X70. (Rapid to X70. no hole drilled)
X80. (Rapid to X80. no hole drilled)
X90. Y60. (ETC)
G80 (You already cancelled the cycle with G0)

Do Not Repeat Axis Moves. 

G81 Z-20. R1. F100. X50. Y50. F200.
X60. Y50. (Don’t need Y50.)
X70.
X80.
X90. Y60.
G80

D0…….

  • Always use a canned cycle if possible it saves loads of time. It is also really easy if you need to edit anything.
  • Make your CAD/CAM system output canned cycles, not long hand code. I saves loads of time if you need to edit.
  • Love engineering and be nice to your cat.

 Really cool way to drill equally spaced holes

Imagine you need to drill and tap this part. Nine M10 holes.


Learn CNC


Learn CNC


Quite simple but 31.63 added up nine times? Mmmm I never learnt my 31.63 times table.

O0001(Drill and Tap M10)

T01 M06 (20mm Spot Drill)

G90 G0 G54 X0 Y0 S1500 M3

G43 Z3. H1 M8
G81 G98 Z-10. R1. F100 L0
G91 X-31.63 L9
G80
G0 G53 Z0
ETC
M30

Learn CNC Programming? How easy is that?

  • The programme moves to the datum X0 Y0 which is the middle of the part at the right hand end.
  • The G81 has an L0 at the end. L0 is not a Lionel Richie song it just means don’t do one. So it moves to X0 Y0 and does nothing.
  • The next line, G91 means incremental move so it moves incrementally nine times (L9) X-31.63 and drills a hole each time.

Brilliant I told you it was worth waiting for.


Learn CNC


Thanks For Reading

Don’t forget there’s loads more folks.

And a YouTube channel

Call David: 07834 858 407

Learn CNC Programming

Services offered at CNC Training Centre

Edgecam training.

Classroom programmer training.

Onsite CNC Machine Training.

CNC Training on all controls and machines.

Mazak Training Fanuc Training

Don’t forget we offer training on all types of Mazak Machines and all Fanuc Controls 6m to 31i Oi old to young.


Canned Cycles Using G98 G99

This article is about CNC Canned Cycles Using G98 G99

Canned Cycles Using G98 G99

(G Code CNC Programming)

It’s not a competition G99 vs G98. sometimes you need G98 sometimes you need G99.

CNC Canned Cycles Using G98 G99, a canned cycle is usually one line of code for example to drill a hole. This one line of code tells the machine all it needs to know about drilling my holes.

G98 G99

  •  Depth
  •  Feedrate.
  •  Point to rapid to before drilling
  •  Point to rapid back to after drilling

Canned Cycles Using G98 G99

G Code Programming Haas Fanuc (ISO) Mazak

What happens then is each time we give the machine a new position it will drill one of these holes. Each hole will be identical unless we change one of the parameters. So if on one hole we put a different Z depth that hole and all subsequent holes will be to the new depth.

CNC Canned Cycles Using G98 G99

So all in all it’s a really easy way to drill holes. You tell it what you want and then each time you give a position you get a hole. Then when you get sick of drilling holes you type in G80.

Machine says OK he don’t want anymore holes so from now on when the machine moves to a position nothing happens.

Mitsubishi Carbide

There are loads of Canned Cycles I can’t be bothered to tell you about them all cos I’m going out tonight otherwise I would explain them. Anyway they all do different stuff like.

  • G84 Tapping
  • G73 High speed Peck Drilling
  • G83 Deep hole Drilling
  • G81 Drilling

They all work in the same way as each other but with variations.

Now the video at the bottom of the page is about CNC Canned Cycles Using G98 G99 and that’s in all the drilling and tapping type cycles.

Ok what does it do? You may well ask, G99 vs G98

I know for a fact that some of you, and I won’t mention names, put this on the line with the canned cycle but you ain’t got a clue what it does. Maybe you don’t even put it in. Maybe you don’t care.
Anyway it’s simple.

  1. You rapid to an initial point
  2. You rapid down close to the hole (this is the R point)
  3. You feed down to depth (Z Depth)
  4. Then you rapid out to either the initial point (1) or the R point (2)

Canned Cycles Using G98 G99

Now if you program G99 it returns to the R point .
If you program G98 it returns to the initial point (that means the first one)

Ok why on earth would I want that?

Well……. if you made the first point say 50mm above the job (About 2 inches) and the rapid point was 1mm above the job (.040”).
You could drill all your holes in G99 and the drill would each time return to 1mm (.040″) above the part. You get to a clamp and you put G98 and it jumps to 50mm (2”) above the part and misses the clamp. Change back to G99 and it stays down returning to 1mm (0.040) above the part.

Get it? So you eliminate wasted moves. Good init.

Canned Cycles Using G98 G99

CNC Canned Cycles Using G98 G99

Take a look at the CNC Training Courses on offer at the CNC Training Centre

Oh and here is my video it explains how to use G98 and G99 to jump over clamps on a fixture.

If you liked this video, please don’t forget to subscribe to my YouTube channel by going to: CNC Training Centre

Please don’t let on if you don’t like it as I am easily offended.

If you want to learn to program CNC Machines

If you want to learn to program CNC Milling Machines

If you want to learn to program CNC Lathes

Look no further Contact CNC Training Centre

Please contact me if you require:

  • Fanuc training.
  • CNC programming training.
  • Want to Learn CNC programming.
  • Fanuc programming   training.
  • Yasnac programming training.
  • Any type of CNC course.

Don’t forget to watch my Tutorial Videos

We offer training on all types of CNC Machines and controls check em out.

co*****@***************re.com

Or fill out the contact form below


CNC Battery Backup

Category : Useful Stuff

CNC Battery Backup

It’s Holiday Time Woopeeee

  • Did you set the burglar alarm?
  • Switched all the lights off?
  • Turned off all the taps?
  • Locked up?
  • Fed the rats?

Oh just one other thing before you go.

CNC Battery Backup


CNC Battery Backup, I had a call from a customer the other day about a mysterious battery warning on the screen of his Haas CNC Lathe, it turns out he had been ignoring a battery alarm for a while. Battery warnings are a bit like strange rashes you ignore them at your peril.

I was too late the machine had lost its memory. A bit like the next day after you got drunk and everyone was telling you about how you got naked in the middle of the dance floor and to you it’s like it never happened.

No matter how many prompts you give the machine now, all is lost. When your battery backup goes unfortunately you don’t just loose your CNC Programmes, oh no you should be so lucky. Obviously it depends on the machine and the control and how the moon is aligned with the planets. You can loose all your parameters, all your offsets, all your settings everything. All in all it’s not good.

CNC Machine Parameters

The parameters are the most important one, if you ignore this whole article (like you did all my others) please don’t ignore this. It could almost scrap your machine, I jest not. All your machine backlash parameters would be lost and even if you had an identical machine these parameters would not be the same they are unique to each machine. You should have a disk or a paper tape or DVD, maybe somewhere in the machine cabinet. Make sure you have a copy of this and it is up to date.

CNC Battery Backup

On  most machines the CNC Battery Backup gets charged when the machine is on and when it’s off that battery keeps hold of all what’s needed for when you switch it back on again. This works fine until the battery gets knackered after a few years. You should get a warning and if you do then you ignore at your peril. The best thing to do now is don’t switch off the machine (the hydraulics is fine to turn off).

CNC Battery Backup

Just press the E Stop (the big one shown above) but don’t switch off the main power. Now get HELP. Oh and by the way if your machine has power saving or auto shut-down you may need to turn this off as some do power down the whole system, this will be in your settings.

CNC Battery Backup

It’s particularly worth looking at before a shutdown type holiday. You might not realise it but this might be the only time in a year when the machine is off for more than a few hours, and that’s when the trouble starts.

Even when everything is restored you need to be really careful it’s a bit like restoring factory settings on your mobile phone  “yea that’s OK” you say. Then for days you keep finding all those little customization you made and forgot about.

CNC Battery Backup

This is my phone (I like to have all the latest gadgets just like you young folk)

Oh By the way don’t forget the new classroom training courses.

CNC Classroom Training Courses    CNC Classroom Training Courses

If you are not familiar with the basics of Turning or Milling then you may need to take one of the course below before you do the New CNC Training Classes above.

CNC Classroom Training Courses    CNC Classroom Training Courses

CNC Battery Backup

Lets talk about what we can do with regards to CNC Battery Backup.

  • Get your machines on a regular maintenance contract.
  • Make sure you have an up to date backup of your machine parameters.
  • All backups should have an extra copy off the premises or in a fireproof safe
  • Always read alarms and don’t procrastinate, it can make you blind.
  • Never ignore warnings on the screen and keep your eyes out for quick flash warning as the machine comes on.
  • Don’t just keep programs in the machine you may have got away with it for years but one day……..

CNC Battery Backup

CNC Program Backup

The method I have found to work the best with regards to CNC program backup is to only keep in the machine the program you are currently using. That way you always have the most up to date program and it prompts operators to update the backup system after alterations. Also it will stop you relying on the machine memory.

There are many very good backup systems you can buy and I would recommend you get one. They usually have a way to quarantine a program so that the programmer can decide to update the master after alterations.

Make sure you have drawing issue numbers etc. on your programs and this covers you for ISO 90001 thingamy or whatever. Most machines have a way of saving all the programs at once and this is often a good temporary measure if your in a rush. On a Haas CNC Machine it puts them all into a single program.

Most machines have a way of saving your offsets either separately or with the programs and this is well worth checking out.

Read The Manual, CNC Battery Backup

This is not just an old man repeating himself yet again. It will tell you how to backup your parameters and offsets etc.

CNC Probes, Auto tool Measure, Lathe Measuring Arms

CNC Battery Backup

You will have to re calibrate these as the settings will be lost. Unless you saved your parameters that is. It is a good idea to write these figures down and if you didn’t do it before do it this time.

These settings effectively store where the probe is in relation to the coordinate system. If you don’t know how to calibrate your probe etc. it’s time to learn it is not only expensive to get this done it will stop you getting round to doing it. Once you have done it you will be surprised how easy it is.


Call me anytime

CNC Classroom Training Courses    CNC Classroom Training Courses

If you are not familiar with the basics of Turning or Milling then you may need to take one of the course below before you do the New CNC Training Classes above.

CNC Classroom Training Courses    CNC Classroom Training Courses

Please contact me if you require:

  • Fanuc training.
  • CNC programming training.
  • Want to learn CNC programming.
  • Fanuc programming training.
  • Yasnac programming training.
  • Any type of CNC course.

Don’t forget to watch my Tutorial Videos

Services offered at CNC Training Centre

Edgecam training.

Classroom programmer training.

Onsite CNC Machine Training.

CNC Training on all controls and machines.

Mazak Training Fanuc Training

Don’t forget we offer training on all types of Mazak Machines and all Fanuc Controls 6m to 31i Oi old to young.


Careers in CNC

View all current vacancies in CNC

Click here

Call David: 07834 858 407