Category Archives: Haas

Well Set Out G Code CNC (CNC Programming)

Well Set Out Code

Contact David 07834 858 407

Well Set Out CNC Code

CNC Training Centre Reviews

30 five star ratings on Google (just saying)

Well Set Out CNC Code is really important. It can save lots of time spent trawling through code trying to find the section you’re looking for. Simple things like leaving gaps after the tool change line can really help.

The program runs exactly the same but……

Look at the two examples of the same program

Well Set-Out

g code cnc
Uncluttered CNC Code

Not Well Set-Out

g code cnc
Cluttered CNC Code
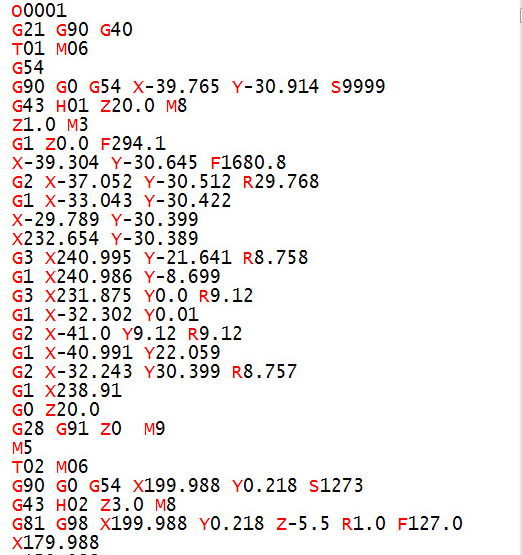
  • Notice where the gaps are.
  • They give clarity to what’s happening in your program.
  • Try to create your own convention and always lay your program out in the same way.
  • Notice how your eyes are drawn to the tool change lines. These are usually the first things you are looking for.

Read On

It’s like reading a book without paragraphs, and page numbers. It also makes it easy to spot mistakes with well set out CNC code.

Dog reading a book

This is my dog, his name s “Get Back Here You Bastard”

See if you can find the simple error in the well set out code and let me know what it is. That way I will know you’re concentrating.

Clue: if you are the fortunate owner of a Haas machine it will spot this for you and alarm out.


Meaningful Comments

Insert meaningful comments. Remember you might not see this code for two years and you won’t remember what you did or how you were thinking at the time.

When you eventually come back to this code you’ll be scratching your arse for hours trying to figure it out.

You’ll think:

“Why the fuck did I do that”

A little comment will explain everything


Well Set Out CNC Code
An Elephant and my wife never forget

Come on Get a Grip

Yes you will figure it out eventually but that’s the same with the human genome project.

Well Set Out CNC Code
It takes time to remember what you were doing

Why do I need Well Set Out CNC Code (Things To Do)

  1. Leave gaps at strategic points in the program.
  2. Loads and loads of comments, write them as you would say it, (don’t try to be posh).
  3. Always make the order of the code the same.
  4. Write an SOP (Standard Operating Procedure) for how you want your code laid out.
  5. Make the tool change lines stand out these are the key points.
  6. Use N numbers at strategic points so that you can easily find things.
  7. Don’t use too many N numbers or you will get confused they are like E numbers they can drive you crazy. They also take up loads of memory.
  8. The machine setter and operator are your customers and you need to make their lives as easy as possible. Give em code that’s easy to read.
  9. If your writing X50. Y50. Z50. don’t write Z50. Y50. X50. Yes it will run OK trouble is it’s bloody confusing.
  10. Someone suggested adding M01 after each tool so I’m adding this in. (Thanks Michael)

An M1 or M01 is an optional stop which means you have the choice to stop at each tool. (Very useful if you want to stop at the next tool and you can’t stand around.)

Continuity

When you arrange the program in the same way every time it will be easy to spot mistakes. If you always put your spindle start and speed at the end of the first position line like this.

G90 G0 G54 X50. Y50. S1500 M03

Were you to miss out the speed you would have a very good chance of noticing it because the line will look wrong.

G90 G0 G54 X50. Y50. M03

Tidy neat code is the same as a neat tidy workshop. It’s much easier to find things.

Thanks for reading my post.

Please contact me if you require:

  • CNC programming training.
  • Want to learn CNC programming.
  • Fanuc control training.
  • Yasnac programming training.
  • Any type of CNC course.
  • Fanuc training courses
  • CNC lathe training
  • CNC Vertical Machining Centre training

Services offered at CNC Training Centre

Edgecam Training.

Siemens Sinumerik Training

Classroom programmer training.

Onsite CNC Machine Training.

Training on all controls and machines.

Mazak Training Fanuc Training

Don’t forget we offer training on all types of Mazak Machines and all Fanuc Controls 6m to 31i Oi old to young.


Haas Reset Program Pointer Setting 31

CNC Training Call David: 07834 858 407

CNC Training Centre Reviews

30 five star ratings on Google (just saying)

Haas Reset Program Pointer Setting 31

Haas Reset Program Pointer

Another setting to look at: Haas Reset Program Pointer. This setting means that when you press that dirty old RESET button.

Haas Reset Program Pointer

If it’s set to on your program will return to the start. If it’s set to off then your program pointer will remain in the same place.

And this is what Haas have to say

Thanks for watching and reading

If you have been affected by any of the issues in this post or need CNC Counselling then contact me.

We really love you but honestly we don’t really care if you break your machine. However if you do, make sure you youtube it. Then you could make a shit load of money from the video.

Oh yea we do CNC Training too, not to mention Classroom Training.

Siemens Sinumerik 840D 828D training

Or call us 

If you want to learn to program CNC Milling Machines

Look no further Contact CNC Training Centre


Haas Programming Training

Haas Programming Milling and Turning

CNC Training Call David: 07834 858 407

CNC Training Centre Reviews

30 five star ratings on Google (just saying)

Haas Programming, the Haas CNC control is very similar to Fanuc and all other ISO type controls. There are settings that you can alter to change its behaviour. This means that you can get it to perform in a similar way to your other controls.

Haas Programming

It is really useful if you need to be able to transfer programs from one machine to the other. It is well worth taking the time to get all your controls to function in the same way.

Link to all Haas settings.

That is probably the major downfall in using some of the special features that different controls have. It is always worth considering this if you are using some unique feature. It may not work on your other controls.

This is why a lot of people use the ISO option on a Mazatrol (Mazak) machine. It means that you can take programmes from your Fanuc or Haas machine and run them on your Mazak. With careful consideration to all your controls this flexibility can be achieved.

Haas Programming

Learning Haas Programming

The Haas control for example has a corner rounding feature whereby you programme a shape as if it has no corner radii. You then add the corners on as an afterthought.

Personally although this sounds very useful in practice it isn’t that common for a drawing to show intersection points. I think the best use is on a square shape. You might want to use it on a square shape to just break the edges. Certainly when Turning it is very useful for breaking sharp edges.

At the CNC Training Centre we can teach you on or offsite. So we could visit you and offer a training course to suit your individual needs. Alternatively if you want to escape your busy day-to-day environment then a classroom training course may be more suitable.


Haas Programming on the Job

Another way to train is to produce an actual part as we train. This has a lot of advantages.

  • You end up with a template part and program that you can use for other jobs.
  • Minimum production loss.
  • Problems are identified as they occur.
  • You make mistakes and increase learning speed.
  • Weakness in knowledge are recognised as they manifest.
“Read More”

Tool Offset Measure Button Haas, Useful or Relic?

Tool Offset Measure Button on a Haas Machines, Useful or Relic?

Call David: 07834 858 407

CNC Training Centre Reviews

30 five star ratings on Google (just saying)

This article is about the Tool Offset Measure button on a Haas machine.

Tool Offset Measure

I first worked on Haas Machines around 1996. The most amazing thing about Haas machines back then was the price. They were cheap, very cheap. At that time the cheapest CNC Machines were like the cost of a diamond studded jockstrap. But the Haas, well as I said it was cheap.

Everyone thought they were made in some far flung country by Santa’s Elves being paid the minimum wage and fed on reindeer shit.

Actually they weren’t. The reason I’m told they were so inexpensive was because they kept the specification of each machine the same. This made them simpler and cheaper to produce.

I fell in love with those early machines and they certainly earned their keep. The control was like a Fanuc that had been given steroids and a rocket up it’s arse for good measure.

Giving People What They Wanted

It was like someone had heard all my criticisms of CNC Machines and granted my wishes

The way that we trained people in those days was to use the tool offset measure button.

What you did was you touched each tool on the top of the component and pressed this button.

(Sorry about the shit picture couldn’t be arsed to find a better one)

It duly recorded the offset value for you.

So what you are doing is recording the distance from the end of the tool at its zero return position to the top of the workpiece.

Tool Offset Measure

This gives you a minus figure the size of a compulsive gamblers bank balance.

Problems

Ok so this works well but there are two problems. Actually no there a three.

  1. You can’t use a tool presetter.
  2. You can’t roughly check this figure by getting a ruler and checking the tool length.
  3. (And this is the big one) when you set a new job you need to do it all again.

Now I could be being really stupid here, and if you know me you are probably saying “well he is a bit of a dick”. Anyway from that day on I’ve avoided this button like Donald Trump avoids wind machines.

A couple of weeks back, when my restraining order was lifted, I was allowed back on a Haas machine to do some training.

They say you learn something new every day well this day I was about to learn about setting 64.

Tool Offset Measure

What this setting does is it allows for whatever work offset you are in when you press the Tool Offset Measure button.

Tool Offset Measure

So what you do is you get your setting block and you touch your spindle nose on it (I used a 6 inch block of slips).

Tool Offset Measure

One of these is even better.

Tool Offset Measure

Then set this in a work offset that you don’t use like G59.

Offset Is Actual Tool Length

  • So when you want to measure a tool.
  • Call out G59 in MDI.
  • Touch the tool on the top of the block.

Tool Offset Measure

Press the button

Tool Offset Measure

And guess what you get the actual tool length. Tool Offset Measure

If you use a tool presetter just tweak the G59 Z figure until it ties in exactly with your tool presetter.

Thanks for watching and reading

If you have been affected by any of the issues in this post or need CNC Counselling then contact me.

Or call us on

If you want to learn to program CNC Milling Machines

Look no further Contact CNC Training Centre


Reposition Haas Machine Mid Program

Reposition Haas  Mid-Program

Haas machines have the best program restart ever. (Providing you switch it on that is.)

You just move to a position in the program and press CYCLE START.

Piss easy.

Reposition Haas

But what if you want to stop a program and move the tool away to look at what you did?

Same Shit different Day

Did you ever work on a machine for years then some smart arse like me comes along and tells you something you didn’t realize it could do?

Well that happened to me the other day, except I did know but never got round to trying it. Anyway if I had said “oh I already knew that” he would have thought I was a smart arsed prick.

Needles to say I didn’t say that.

Back to Reposition Haas  Mid-Program

Well you guessed it they even thought of that.

It means you can drill a hole, move the drill away and have a good look inside and then continue with the program just like nothing ever happened.

Here We Go

First of all Press Feed Hold button.

Reposition Haas

Actually it’s not that one it’s the red one next to it, sorry but I don’t have an animated GIF for that.

Then press X, Y or Z followed by the Handle Jog button.

The control will now store the X, Y, and Z positions.

You will now see the message  “Jog Away”on the screen.

Now use your handwheel to move the tool away.

Reposition Haas

You can use other manual controls to stop spindle and coolant etc if you wish.

Do whatever you want to do.

  • Inspect the part.
  • Blow the hole out.
  • Remove your own appendix without anesthetic.

Now move the tool close to where it originally was making sure nothing is in the way for it to hit.

Now go back into memory mode.

Press Cycle Start.

Reposition Haas

The control will display the message “Jog Return”

X and Y will move back to position at 5% .

Then axis.

And bang away you go.

The program continues.

Thanks for watching and reading

If you have been affected by any of the issues in this post or need CNC Counselling then contact me.

Or call us

If you want to learn to program CNC Milling Machines

Look no further Contact CNC Training Centre


Careers in CNC

View all current vacancies in CNC

Click here

Call David: 07834 858 407