Haas Spindle Warm Up Macro

Haas Spindle Warm Up Macro

Call David: 07834 858 407


CNC Training Centre Reviews

30 five star ratings on Google

Warm up Programme

Haas Spindle Warm Up MacroHaas Spindle Warm Up Macro

This Haas Spindle Warm Up Macro is something I created recently for the Macro training course that we offer at the CNC Training Centre. The course covers Macro Programming suitable for Mazak, Haas and Fanuc.

This course will be available online soon.

Please fill out the enquiry form on the right if you are interested.

I must admit I often think that where Macro programming is concerned, a little knowledge is a dangerous thing. I just think it’s more about a programmer’s ego than really getting good code.

This article gives a brief description of macro programming if you just want the Haas Spindle Warm Up Macro then jump to the end and copy it. I won’t be offended, honestly.

Be Careful What you Wish for.

Gratuitous use of macro programming , can be dangerous and very confusing to the operator using it.

If you don’t know what gratuitous means don’t worry neither do I, I just heard a bloke say it on the telly.

  • Using a macro can automate a regular task.
  • Families of parts can be grouped together in one programme.
  • All macros need to be “fool proofed” you must add alarms to protect from erroneous input.
  • Use parameters to lock and protect your macro programmes.
  • Macros can be aliased to G and M codes.
  • Don’t reinvent the wheel every day, just use a macro.
  • Don’t forget to check if you have the macro option on your machine it can be quite expensive to add on.

This macro (Haas Spindle Warm Up Macro) is for the warming up of the spindle on your Haas machine.

It does not take big leaps in speed so it’s smoother and more gradual.

Set the maximum rpm you want to warm up to and the time you want the warm up to run for. You also set the initial speed you want your spindle to start at from cold. Also give it the amount the speed increases per step.

It will calculate the difference between your start speed and your maximum speed. Then it divides this speed by the speed increment that you give it. From this it will know how many times to loop.

Once in the loop it uses the machine timer #3001. It zeros the timer then runs it for the calculated time each step.

Time needs to be set in milliseconds because that’s what the geeks use in these machine timers, so it multiplies by 60,000.

Ideally I suggest you alias it to an M code.

Alias what the fuck is an alias?

No it’s not like changing your name from Reginald Kenneth Dwight to Elton John no no it is a bit more sophisticated.

What does Alias mean.

It means you can access a programme using your own G code or M code.

Mazak Spindle Warm Up Macro

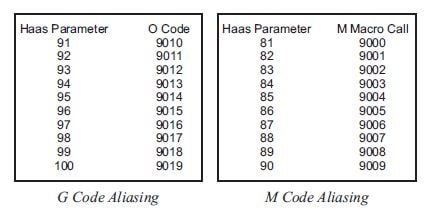
So for example see above. If you put 201 into parameter 91 when you programme a G201 it enters programme 9010. Like programming M98 P9010 or G65 P9010. With a G code you can pass arguments to the programme a bit like G81. In G81 you tell it the depth and rapid point these are the Z and the R values. These are called arguments. So now you can do the same with your very own G code.

G81 G98 Z-10. R1. F100.

Also for parameter 81 (see above) if you put 33 into parameter 81 when you programme M33 the control will jump into programme 9000. You cannot pass arguments when you use an M code. Best not to argue then, I say.

So for my Haas Spindle Warm Up Macro we will use M33 and alias it to programme 9000. So having done all this you can lock out programme 9000 so no one can even see it. (It can be our little secret). They will not be able to edit or delete it either.

All they need to know is that M33 will run the Haas Spindle Warm Up Macro.

M33 is aliased to O9000

A word about testing.

When you test your macro you don’t want your control to look ahead.

Why Does Your Programme Need to Look Ahead?

Let’s talk about cutter compensation:

Below is a tool path where the tool is compensated to the left. To machine the part without cutting into it the control would need to read in front.

Mazak Spindle Warm Up Macro

It moves up the left hand side so it needs to know where its going in advance, moving round the outside in single block it would stop here.

Mazak Spindle Warm Up Macro

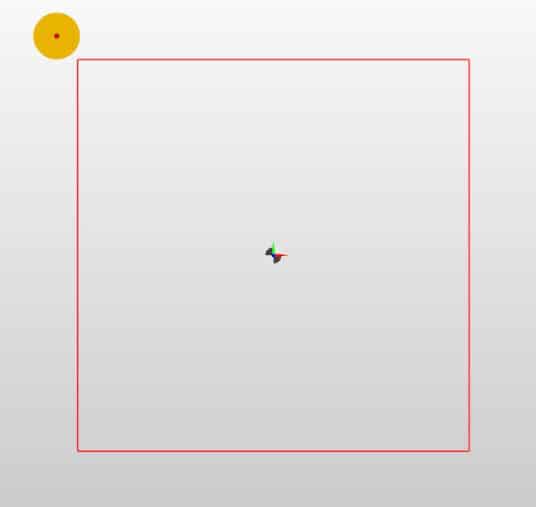
If it were about to cancel compensation it would end here.

Mazak Spindle Warm Up Macro

If it were about to go left on the inside it would stop here.

Haas Spindle Warm Up Macro

They would all be the same Y position but in single block it would stop in three different places.

So this explains why the control needs to look ahead. Each move relies on the next one for it’s positioning.

When we write macro programmes and are testing them this look ahead can be a real pain in the arse. You see the system often will know the answer before you think it has seen the question.

Complicated? Read on, I meant to confuse you so it makes me look intelligent.

Please Explain

Right , what we do is to use a G code that will stop the system from looking ahead. We can then single block through our macro and check the calculations as we go.

When we are happy with the code we can let the system look ahead again by turning look ahead back on.

Although what you are doing may be very simple in terms of calculations a very simple mistake can really bugger things up.

Be very systematic in your approach and test each section of your macro as you go. As you are happy that each line works move on to the next.

Try my Haas Spindle Warm Up Macro below. Turn off the block look ahead and the single block restriction and check each variable as it changes. It will help you to understand how the Haas Spindle Warm Up Macro works.

One other thing, plan your macro before you start don’t get too excited and rush on. Keep a record of what variables you have used so you don’t accidentally use a variable twice. Things can get very messed up if you do.

Comment, comment, and more comments to say what the comments mean. You can’t have too many comments in a macro. The best approach is to imagine you were abducted by aliens. Will anyone understand your code if they don’t bring you back to Earth?

If you are like me and you have the memory of a goldfish then you will need them for yourself when you look back at this macro in years to come.

Check out this fantastic article on how to lay out your CNC code and comments.

“The code, give me the code?”  you ask.

OK OK.

So here is my Haas Spindle Warm Up Macro.

Hope it is useful to you.

PLEASE DO NOT USE THIS MACRO IF UNDER 18 OR OF A NERVOUS DISPOSITION

Mazak Spindle Warm Up Macro

Oh by the way if you get bored easily then don’t read all this shit. Just put the code in your machine and enjoy it with my compliments.

Haas Spindle Warm Up Macro

O09000 (Haas Spindle Warm Up Macro)

G103 P1 (NO BLOCK LOOK AHEAD)

#3004= 7 (OVERRIDE CONTROL NOT ALLOWED)
#100= 20. (TIME)
#101= #100 * 60000. (TIME MILLISECONDS)

#102= 500. (RPM FROM COLD)
#103= 7000. (MAX RPM)
#104= #103 – #102 (RPM INCREASE)

#105= 1. (RPM STEP)
#106= #104 / #105 (LOOP)
#107= #101 / #106 (DWELL)
M03 S#102 (Start spindle at initial speed)

WHILE [ #106 GT 0 ] DO1 (DO LOOP)
S#102 (START SPINDLE AT INCREASED RPM)
#3001= 0 (RESET INTERNAL TIMER TO ZERO)

WHILE [ #3001 LT #107 ] DO2
END2

#106= #106 – 1 (COUNTER DECREASES BY ONE)
#102= #102 + #105 (INCREASE SPEED BY STEP)
END1

#3004= 0 (OVERRIDE BACK ON)

G103 P0 (NO BLOCK LOOK AHEAD)

M30 

Very boring so what does it all mean? You ask.

Explanation of my Haas Spindle Warm Up Macro

O09000 (Haas Spindle Warm Up Macro)

G103 P1 (NO BLOCK LOOK AHEAD)
(This will stop block look ahead)

#3004= 7 (OVERRIDE CONTROL NOT ALLOWED)
(Set this to a 7 to stop override of speed.)

#100= 20. (TIME)
(Total time of warm up in minutes)

#101= #100 * 60000. (TIME MILLISECONDS)

#102= 500. (RPM FROM COLD)
(Spindle will start at 500 RPM)

#103= 7000. (MAX RPM)
(Maximum RPM you want the warm up to reach)

#104= #103 – #102 (RPM INCREASE)

#105= 1. (RPM STEP)
(This in the step used as the RPM increases)

#106= #104 / #105 (LOOP)
(Calculate the number of times it goes around the loop)

#107= #101 / #106 (DWELL)
(Dwell time after each speed increase)

M03 S#102 (Start spindle at initial speed)

WHILE [ #106 GT 0 ] DO1 (DO LOOP)
S#102 (START SPINDLE AT INCREASED RPM)
#3001= 0 (RESET INTERNAL TIMER TO ZERO)

Haas Spindle Warm Up Macro

WHILE [ #3001 LT #107 ] DO2
(TIMER COUNTS DOWN BY DWELL TIME)
END2

#106= #106 – 1 (COUNTER DECREASES BY ONE)
#102= #102 + #105 (INCREASE SPEED BY STEP)

END1

#3004= 0 (OVERRIDE BACK ON)
(Override works again.)

G103 P0 (BLOCK LOOK AHEAD)
(This will put block look ahead back on)

M30

Single Block

You can stop single block from working in a macro.

It is really annoying if you expect your spindle to warm up in 20 minutes. You come back having made tea cos you left the machine in single block.

“Shit” (expletive of your choice) “the machines been on single block and stopped on 500 rpm for 20 minutes”

#3003= 1 (SINGLE BLOCK OFF)

#3003= 0 (SINGLE BLOCK ON)

Stop single block is used in a G84 tapping cycle. There is a thought, imagine using single block when tapping. (You may need to think about that one)

I also have suppressed spindle override because you want the correct speed in a warm up programme. So your override control won’t work until it’s cancelled again at the end of the macro.

Again this is used in G84.

If you read the code and explanations above you’ll see how it works.

Haas Spindle Warm Up Macro

Oh and by the way here is a similar article for a Mazak machine.

Services offered at CNC Training Centre

Edgecam Training.

Classroom programmer training.

Onsite CNC Machine Training.

CNC Training on all controls and machines.

Mazak Training Fanuc Training

Don’t forget we offer training on all types of Mazak Machines and all Fanuc Controls 6m to 31i Oi old to young.


CNC Programming Safely Using Decimal Point

CNC Training Call David: 07834 858 407

CNC Training Centre Reviews

30 five star ratings on Google (just saying)

CNC Programming Safely (Decimal Points)

CNC Programming Safely is very important. This post explains about the role of the decimal point.

Decimal points who needs em eh?

On Fanuc controls and Haas controls depending on the setting of a parameter if you input something like X20 it can be taken in two ways.

(1) X20 is taken as a movement in X of 20mm this is like a calculator and some controls will convert this to 20.000 for you.

(2) X20 is taken as 20 microns which would be .020

The difference between 20mm and .02mm is massive would you agree?

CNC Programming Safely

This also works on feed rates so you could be waiting a long time. Or the other way around you end up with a pile of broken tools.

The most dangerous one is with offsets this will definitely cause a collision.

I remember those things in comic books where you have to find the difference between two pictures. The difference with a CNC Machine is it can cost you your job if you don’t spot the missing decimal point.

Even at five years old I couldn’t really be arsed. I remember swearing for the first time and thinking “fuck this, pass the water pistol”

Sorry this is not true, obviously I was swearing long before my fifth birthday.

Please contact me with the answers to the quiz above (that way I’ll know never to offer you a job)

Decimal Points

Now you could go diving for your manuals and check your parameters and settings. I don’t actually recommend that right now.

Think of people like me and all those applications engineers who work here there and everywhere.

It maybe that in your company you have machines set in different ways and that’s gonna be real confusing.

It is obviously a good idea to have all your machines working in a similar manner if possible.

CNC Programming Safely

So in order to do your CNC Programming Safely I recommend that you make a rule when you are inputting code.

Always include a decimal point regardless of the control settings.

That way whatever your machine setup you will still get the right movements and offset adjustments.

Never Use a Decimal Point (CNC Programming Safely)

M codes
S Codes
G codes although there are exceptions such as G54.1
H numbers
T codes
L
N numbers
O (Programme numbers)
P  address

And if you do you will get an alarm. There are exceptions to these rules but you would need to check your programming manual.

Use a Decimal Point (CNC Programming Safely)

B   address
C   address
D  address
E   address
F   code
I   address
J   address
K  address
Q  address
R  address
U  address
V  address
W address
X  address
Y  address
Z  address

I have trained people who insist on programming X0.0 and that is ok if it helps you to remember the decimal point. Even though on X0 it would make no difference but rules are rules.
Just remember that if you change companies it will be very hard to break the habit if you are not inputting decimal points.

It’s a bit like keep putting your hands down your trousers. When your at home it’s a minor bollocking from the wife.

Try it in public and you’ll end up on the sex offenders register.

Those using CAD/CAM systems it is quite easy to change your post processor to always output decimal points too.

Here is the Fanuc parameter that you can alter.

Click Me

Services offered at CNC Training Centre

Edgecam training.

Classroom programmer training.

Onsite CNC Machine Training.

CNC Training on all controls and machines.

Mazak Training Fanuc Training

Don’t forget we offer training on all types of Mazak Machines and all Fanuc Controls 6m to 31i Oi old to young.


Haas Reset Program Pointer Setting 31

CNC Training Call David: 07834 858 407

CNC Training Centre Reviews

30 five star ratings on Google (just saying)

Haas Reset Program Pointer Setting 31

Haas Reset Program Pointer

Another setting to look at: Haas Reset Program Pointer. This setting means that when you press that dirty old RESET button.

Haas Reset Program Pointer

If it’s set to on your program will return to the start. If it’s set to off then your program pointer will remain in the same place.

And this is what Haas have to say

Thanks for watching and reading

If you have been affected by any of the issues in this post or need CNC Counselling then contact me.

We really love you but honestly we don’t really care if you break your machine. However if you do, make sure you youtube it. Then you could make a shit load of money from the video.

Oh yea we do CNC Training too, not to mention Classroom Training.

Siemens Sinumerik 840D 828D training

Or call us 

If you want to learn to program CNC Milling Machines

Look no further Contact CNC Training Centre


Haas Programming Training

Haas Programming Milling and Turning

CNC Training Call David: 07834 858 407

CNC Training Centre Reviews

30 five star ratings on Google (just saying)

Haas Programming, the Haas CNC control is very similar to Fanuc and all other ISO type controls. There are settings that you can alter to change its behaviour. This means that you can get it to perform in a similar way to your other controls.

Haas Programming

It is really useful if you need to be able to transfer programs from one machine to the other. It is well worth taking the time to get all your controls to function in the same way.

Link to all Haas settings.

That is probably the major downfall in using some of the special features that different controls have. It is always worth considering this if you are using some unique feature. It may not work on your other controls.

This is why a lot of people use the ISO option on a Mazatrol (Mazak) machine. It means that you can take programmes from your Fanuc or Haas machine and run them on your Mazak. With careful consideration to all your controls this flexibility can be achieved.

Haas Programming

Learning Haas Programming

The Haas control for example has a corner rounding feature whereby you programme a shape as if it has no corner radii. You then add the corners on as an afterthought.

Personally although this sounds very useful in practice it isn’t that common for a drawing to show intersection points. I think the best use is on a square shape. You might want to use it on a square shape to just break the edges. Certainly when Turning it is very useful for breaking sharp edges.

At the CNC Training Centre we can teach you on or offsite. So we could visit you and offer a training course to suit your individual needs. Alternatively if you want to escape your busy day-to-day environment then a classroom training course may be more suitable.


Haas Programming on the Job

Another way to train is to produce an actual part as we train. This has a lot of advantages.

  • You end up with a template part and program that you can use for other jobs.
  • Minimum production loss.
  • Problems are identified as they occur.
  • You make mistakes and increase learning speed.
  • Weakness in knowledge are recognised as they manifest.
“Read More”

Tool Offset Measure Button Haas, Useful or Relic?

Tool Offset Measure Button on a Haas Machines, Useful or Relic?

Call David: 07834 858 407

CNC Training Centre Reviews

30 five star ratings on Google (just saying)

This article is about the Tool Offset Measure button on a Haas machine.

Tool Offset Measure

I first worked on Haas Machines around 1996. The most amazing thing about Haas machines back then was the price. They were cheap, very cheap. At that time the cheapest CNC Machines were like the cost of a diamond studded jockstrap. But the Haas, well as I said it was cheap.

Everyone thought they were made in some far flung country by Santa’s Elves being paid the minimum wage and fed on reindeer shit.

Actually they weren’t. The reason I’m told they were so inexpensive was because they kept the specification of each machine the same. This made them simpler and cheaper to produce.

I fell in love with those early machines and they certainly earned their keep. The control was like a Fanuc that had been given steroids and a rocket up it’s arse for good measure.

Giving People What They Wanted

It was like someone had heard all my criticisms of CNC Machines and granted my wishes

The way that we trained people in those days was to use the tool offset measure button.

What you did was you touched each tool on the top of the component and pressed this button.

(Sorry about the shit picture couldn’t be arsed to find a better one)

It duly recorded the offset value for you.

So what you are doing is recording the distance from the end of the tool at its zero return position to the top of the workpiece.

Tool Offset Measure

This gives you a minus figure the size of a compulsive gamblers bank balance.

Problems

Ok so this works well but there are two problems. Actually no there a three.

  1. You can’t use a tool presetter.
  2. You can’t roughly check this figure by getting a ruler and checking the tool length.
  3. (And this is the big one) when you set a new job you need to do it all again.

Now I could be being really stupid here, and if you know me you are probably saying “well he is a bit of a dick”. Anyway from that day on I’ve avoided this button like Donald Trump avoids wind machines.

A couple of weeks back, when my restraining order was lifted, I was allowed back on a Haas machine to do some training.

They say you learn something new every day well this day I was about to learn about setting 64.

Tool Offset Measure

What this setting does is it allows for whatever work offset you are in when you press the Tool Offset Measure button.

Tool Offset Measure

So what you do is you get your setting block and you touch your spindle nose on it (I used a 6 inch block of slips).

Tool Offset Measure

One of these is even better.

Tool Offset Measure

Then set this in a work offset that you don’t use like G59.

Offset Is Actual Tool Length

  • So when you want to measure a tool.
  • Call out G59 in MDI.
  • Touch the tool on the top of the block.

Tool Offset Measure

Press the button

Tool Offset Measure

And guess what you get the actual tool length. Tool Offset Measure

If you use a tool presetter just tweak the G59 Z figure until it ties in exactly with your tool presetter.

Thanks for watching and reading

If you have been affected by any of the issues in this post or need CNC Counselling then contact me.

Or call us on

If you want to learn to program CNC Milling Machines

Look no further Contact CNC Training Centre


Careers in CNC

View all current vacancies in CNC

Click here

Call David: 07834 858 407