30 five star ratings on Google (just saying)
Warm up Programme
This Mazak Spindle Warm Up Macro is something I created recently for the Macro training course that we offer at the CNC Training Centre. The course covers Macro Programming suitable for Haas, Mazak and Fanuc.
I must admit I often think that with Macro programming a little knowledge is a dangerous thing. On visiting companies I just think it’s more about a programmer’s ego than really getting good CNC code.
See this article, it gives a brief description of macro programming.
If you just want the Mazak Spindle Warm Up Macro then just jump to the end and copy it. I won’t be offended by the fact that you are just too selfish and greedy and can’t even spare the time to read my articles that I slave for hours to produce!
Gratuitous use of macro programming (that’s bullshit to the normal folk), can be dangerous and really confusing to the operator using it.
- A macro can automate a regular task.
- Families of parts can be grouped together and simplified in one programme.
- Macros should be fool proofed with alarms to prevent erroneous input.
- The details of the macro ideally should be protected (ie lock the 9000 programmes).
- Where possible alias the macro to a G or M code.
- The machine operator is your customer so treat him or her well.
- If you don’t like re-inventing the wheel every day then macros are for you.
- Don’t forget to check if you have the macro option on your machine it can be quite expensive to add. Oh and it will really piss you off if you read this whole article and find you ain’t got it!
Some Explanation.
This macro (Mazak Spindle Warm Up Macro) is for the warming up of the spindle, it’s a much smoother warm up because it does not take big leaps in speed. It is a much more gradual approach.
You tell it your maximum rpm you want to warm up to and the time you want the warm up to last. You can tell it what RPM increase you want as a step. You also tell it the initial speed you want your spindle to start at from cold.
It goes on to calculate the difference between your start speed and your maximum speed. It divides this speed by the speed increment that you give it. This will tell it how many times to go around the loop.
In the loop it uses the machine timer. It zeros the timer then runs it for the calculated time for each step.
It has to then get this time in milliseconds because that’s what the geeks use in these machine timers.
Ideally it should be aliased to an M code.
Alias WTF? No it’s not like changing your name from Reginald Kenneth Dwight to Elton John it is a bit more sophisticated.
What it means.
Well it means you can access a programme using your own G code or M code.
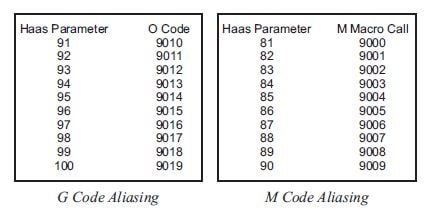
So for example if you put 200 into parameter 92 when you programme a G200 it will jump to programme 9011. Just as if you had put M98 P9011 or G65 P9011. With a G code you can pass arguments to the programme a bit like G81. In G81 you tell it the depth and rapid point these are the Z and the R values. Now you can do the same with your G code.
Also for parameter 82 if you put 33 into parameter 81 when you programme M33 the control will jump into programme 9001. You cannot pass arguments when you use an M code. Best not to argue then eh.
So for my Mazak Spindle Warm Up Macro we will use M33 and alias it to programme 9000. So having done all this you can lock out programme 9000 so no one can even see it. (Our little secret). They will not be able to edit it either.
All they need to know is that M33 will run the Mazak Spindle Warm Up Macro.

Now then a word about testing.
Actually it’s more than one word but here we go.
When you test your macro you need to stop your control from looking ahead, put the blinkers on as it were.
(Sorry that’s totally wrong blinkers actually make a horse look ahead and not to the side). Anyway CNC controls have to look ahead and here is why.
Cutter Compensation.
Below is a typical tool path where the tool is compensated to the left. In order to machine the part without cutting into it the control needs to read in front.

As it moves up the left hand side it needs to know where its going in advance, moving round the outside in single block it would stop here.
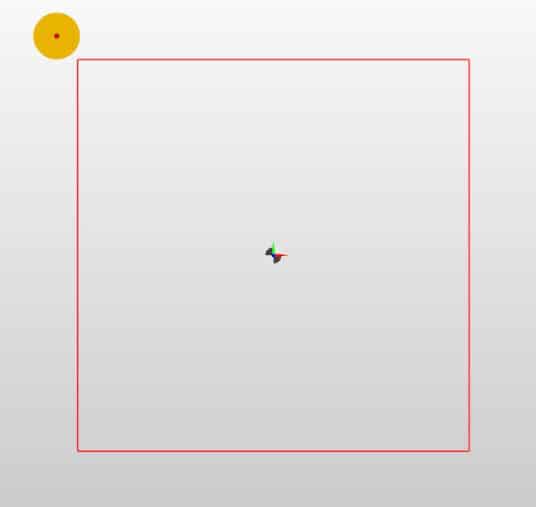
If it were about to cancel the compensation it would end the move here.

If it were about to go to the left on the inside it would need to stop here.

They would all be the same Y position but in single block it stops ready for the next move (three different places).
So this explains why the control looks ahead. Each move relies on the next for correct positioning.
When we write a macro programme and we are testing it this look ahead is a real nightmare. The system often will know the answer before you think it has seen the question.
Complicated? mm read on:
Right joking aside, what we do is to use a G code to stop the system from looking ahead. What we can then do is single block through the macro and check the calculations as we go.
When you are happy with the code you can let the system look ahead again by turning look ahead back on.
Although what you are doing may be very simple, a very small mistake can really bugger things up. (Sorry for saying bugger, I meant knacker).
Have a System.
Now my advise here is to be very systematic in your approach and test each line of your macro as you go. Be happy that each line works ok before you move on to the next.
You can try it this with the Mazak Spindle Warm Up Macro below. Turn off the block look ahead and the single block restriction and check each variable as it is changed. It will help you to understand how the Mazak Spindle Warm Up Macro works.
Oh one other thing plan your macro before you start don’t get to excited and rush on. Also keep a record of what variables you have used so that you don’t accidentally use a variable twice. Things can get very scary if you do this.
Comment, comment, comments and more comments to say what the comments are for. Honestly you can’t have too many comments in a macro. The best approach is to imagine that you were abducted by aliens (I sincerely hope you never are) but if you are the will anyone understand your code?
If the answer is no then you are not explaining your code well enough. Also if you are like me and you have a poor memory then you will need them for yourself. So when you look back at this macro in 200 years you will know what it meant.
Check this article on how to lay out your CNC code and add comments.
“The code give us the bloody code?”
OK.
So here is the Mazak Spindle Warm Up Macro.
I hope it works for you.
PLEASE DO NOT USE THIS MACRO IF YOU ARE UNDER 18 OR ARE OF A NERVOUS DISPOSITION

Oh by the way if you get bored easily then I definitely wouldn’t read all this. Just put the code in your machine and enjoy it with my compliments (thicko).
Mazak Spindle Warm Up Macro
O09000 (Mazak Spindle Warm Up Macro)
#3004= 7 (OVERRIDE CONTROL NOT ALLOWED)
#100= 20. (TIME)
#101= #100 * 60000. (TIME MILLISECONDS)
#102= 500. (RPM FROM COLD)
#103= 7000. (MAX RPM)
#104= #103 – #102 (RPM INCREASE)
#105= 1. (RPM STEP)
#106= #104 / #105 (LOOP)
#107= #101 / #106 (DWELL)
M03 S#102 (Start spindle at initial speed)
WHILE [ #106 GT 0 ] DO1 (DO LOOP)
S#102 (START SPINDLE AT INCREASED RPM)
#3001= 0 (RESET INTERNAL TIMER TO ZERO)
WHILE [ #3001 LT #107 ] DO2
END2
#106= #106 – 1 (COUNTER DECREASES BY ONE)
#102= #102 + #105 (INCREASE SPEED BY STEP)
END1
#3004= 0 (OVERRIDE BACK ON)
M30
Boring, boring so what does it all mean?
Explanation of Mazak Spindle Warm Up Macro
O09000 (Mazak Spindle Warm Up Macro)
#3004= 7 (OVERRIDE CONTROL NOT ALLOWED)
(Set this to a 7 to stop override of speed.)
#100= 20. (TIME)
(Total time of warm up in minutes)
#101= #100 * 60000. (TIME MILLISECONDS)
#102= 500. (RPM FROM COLD)
(Spindle will start at 500 RPM)
#103= 7000. (MAX RPM)
(Maximum RPM you want the warm up to reach)
#104= #103 – #102 (RPM INCREASE)
#105= 1. (RPM STEP)
(This in the step used as the RPM increases)
#106= #104 / #105 (LOOP)
(Calculate the number of times it goes around the loop)
#107= #101 / #106 (DWELL)
(Dwell time after each speed increase)
M03 S#102 (Start spindle at initial speed)
WHILE [ #106 GT 0 ] DO1 (DO LOOP)
S#102 (START SPINDLE AT INCREASED RPM)
#3001= 0 (RESET INTERNAL TIMER TO ZERO)
WHILE [ #3001 LT #107 ] DO2
(TIMER COUNTS DOWN BY DWELL TIME)
END2
#106= #106 – 1 (COUNTER DECREASES BY ONE)
#102= #102 + #105 (INCREASE SPEED BY STEP)
END1
#3004= 0 (OVERRIDE BACK ON)
(Override works again.)
M30
Single Block
You can suppress single block in a macro. You can suppress single block in this macro (Mazak Spindle Warm Up Macro) because it is really annoying if you expect your spindle to warm up in 30 minutes. You come back having made tea, toast and croissants (as us engineers do).
“Shit” you say “the machines been on single block and stopped at 500 rpm for 30 minutes”
Just add these.
#3003= 1 (SINGLE BLOCK OFF)
#3003= 0 (SINGLE BLOCK ON)
I have suppressed spindle override because you need the correct speed in a spindle warm up programme.
If you read the explanations above you will see how it works.

Services offered at CNC Training Centre
Edgecam Training.
Classroom programmer training.
Onsite CNC Machine Training.
CNC Training on all controls and machines.
Mazak Training Fanuc Training
Don’t forget we offer training on all types of Mazak Machines and all Fanuc Controls 6m to 31i Oi old to young.