Today I got to train someone on a Haas SL15 Lathe, it had live tooling and a sub spindle.
It also had a bar-feed.
Not worked on one of these for a while. Tell me why on earth don’t other companies look at the pragmatic approach that Haas take to CNC Machining and copy it?
Say what you like about Haas machines but they have an incredible knack of shattering the bullshit and making stuff easy.
Here are two massive ones.
G112
G112 tricks the Haas SL15 CNC Lathe into thinking it’s a machining centre and that it can mill.
It’s like gender identity for CNC Machines. But, and this is the “for fuck sake bit”, on most machines you have to program it like a machining centre but then when your done you need to double X and switch all the Y’s for C’s.
Sounds simple but in practice it’s a shit storm, specially when programming G2 and G3.
When Mr Haas invented the Haas SL15 CNC Lathe he must have looked at this and laughed. Here is a really clever idea. We’ll trick the machine into thinking it’s a machining centre and here is the clever bit. We’ll keep up the facade.
So you make a milling program (XY) and then……. you leave it that way. How incredibly clever is that?? Mmmmmm
Even experienced machinists with years of experience often do this completely wrong. It really can be done without crashing the machine.
What You MUST NOT DO When Checking CNC Programs
Don’t allow anyone to stand over you especially if it makes you nervous tell the boss to piss off.
Never ever rush this process.
Always carry out all the checks below before you prove out.
Don’t cut corners.
Never take off machine interlocks or override any kind of safety device.
Do not prove out your program when you need the toilet.
Have a Plan
It sounds stupid but what will you do if something goes wrong when you’re Checking CNC Programs.
Do you remember when you first drove a car?
The first emergency stop you did?
Well you didn’t automatically hit the brakes and depress the clutch did you? You had to think.
I thought these gloves made you drive better
When you are an experienced driver, in an emergency you will automatically hit the brakes. This is because a path is permanently etched on your brain and it’s almost an involuntary action.
This is the same with a CNC Machine if you are used to hitting the E Stop button then it will come automatically.
This is often called “muscle memory” which incidentaly is a complete misnomer. Muscles don’t have memory.
A bit like me there are loads of things I don’t remember. My wife recons when I came home the other night completely bladdered that I urinated in the wardrobe before eating the contents of the dog bowl.
As far as I’m concerned it never happened.
If you are like me, working on lots of different CNC Machines almost everyday, then you really don’t have a clue where the Emergency Stop Button is.
I still can’t remember which drawer my fuckin socks are kept in let alone the complex layout of 100 different CNC Machines.
The Plan For Checking CNC Programs
It’s easy, if you are new to the machine and you have any doubts at all, hold your hand over the Emergency Stop Button. Then in your mind think “one false move and you get it sucker”.
Pressing the E Stop button doesn’t start world war three but what it will do is halt everything instantly.
Big machines are the exception to this rule
The more metal swinging around the harder it is to stop. On these machines it’s probably best to just go into a blind panic and run off.
After hitting the E Stop you may have to go through your machines start-up procedure. You may even have to get a boring bar out of a tight spot but you didn’t break anything did you. That’s the idea.
So to use the car analogy. You think…..
Press brake and clutch.
Control the car.
You can panic now (it’s over you didn’t kill anyone)
So do the same with your machine…
Press the Emergency Stop.
Mmm, there is no number 2
Obviously your plan will not always be to hit the E Stop. This would be a very short blog if that’s my only advise.
You may just want to press Cycle Stop or the Feed Hold button.
The main idea is that you are covering the button you’re about to press. This keeps things really simple, the way I like it. In a panic you won’t have a clue where the button is.
The System When Checking CNC Programs
When Checking CNC Programs (proving a program) you should either be looking at the program with the machine stopped or, looking in the machine whilst it is running. You can’t do both at the same time so….
Stop the machine and look at the program.
Start the machine while you’re looking inside with your finger ready to feed hold or E stop.
Dry Run
Most machines have a Dry Run Button or switch. Personally I never use them. Dry Run gives you a feed control over both rapid and feed moves and it does depend on parameter settings as to how it works.
It means that you can control all your moves with the feedrate potentiometer.
Sorry for being posh a potentiometer is the dial thingamajig. Say it in front of the boss and if you get a pay rise I want a percentage.
Anyway try it and see what you think, (dry run that is). Your machine parameters will give you the option to override rapid moves or not.
OK so why don’t I like dry run?
That’s an easy one.
When using dry run it is easy to get carried away and feed really fast on a rapid move but don’t forget when you come to the next feed move you are probably feeding way too fast and you will break the tool.
Yes you have guessed it I have done that on a few occasions.
On some controls Dry Run will stop the spindle from running so it has to be run in fresh air with no part in the machine.
Rapid Override
Buttons or dials, you can override all rapid moves by a percentage.
On some of the Heidenhain control panels the override works for rapid and feed moves so you just have one control.
Beware because some controls have a massive difference between the slowest and the next setting. It’s either like watching paint dry or shit off a stick.
Machine Lock
You can use the machine lock which does as it says. Nothing moves so it is purely for testing the code. All the positions etc will change so you will see everything moving on your position display but the axis are locked.
CAUTION
On some older machines the machine will completely lose its position and you will need to zero return after using this. It’s what’s known as a shit storm.
Personally I think it’s a waste of space. Unfortunately on some controls you have to use it to run the graphics so you have no choice.
If at this point you are thinking “what the fuck”. I totally agree don’t get me started on graphics.
MST Lock
If you use this let me know cos I don’t know anyone who does. It effectively locks all M Codes all S Codes and all T codes.
So:
No coolant.
No spindle start.
No tool change.
Etc Etc
Running The Program 10 Foot Above the Part
Again not something I do. Some people like to run the program above the job (in fresh air). Or on a lathe away from the chuck.
The only problem is you still won’t be sure the program is OK when you do it for real. Anyway do it if you want I won’t ban you from my website or anything.
If you must do this it’s best to put a figure in the external work offset as below.
This means your program will run 100mm above your Z datum.
Don’t forget this shifts all your offsets so you need to proceed with caution,
You are very likely to forget to put this back. Even worse you may alter the wrong figures.
The long term solution is to put this line of code in every program which will reset it, you might want to put a block skip too so that you can skip it when you test the program.
Graphics
If you got em use em. A lot of, in fact all, machine graphics tend to be complete dogshit.
It is not like a CAM system such as Edgecam where you can completely collision check your program.
Don’t forget it’s a good way to pick up coding errors and you will see if you drilled a hole miles out of position.
We are looking for the big hitters here, big mistakes.
You definitely won’t know if a hole is a mm out of position but that is not really the idea. Read this article.
The Dangerous Bits When Checking CNC Programs
The most dangerous part in any program is when each tool first comes down to the part.
Why?
Because that’s when you apply the tool length and the work offset. Both of these can be wrong.
The second most dangerous time is when the tool leaves the part and goes back to tool change position.
Before You Start, Be Patient Tiger
Let’s do a checklist Before Checking CNC Programs Out
Milling First.
Check datum in MDI. Move your machine to X0 Y0 in your work offset as a test. You can test the Z too but be careful.
Does every tool have its length set? If you use proper tool lengths in your offsets then as a rough guide you can manually measure each tool with a steel rule as it comes out.
On Fanuc type controls make sure the T and H codes correspond. On a Haas Machine this can be automatically checked by changing a setting and it will give an alarm (Setting 15).
Also on Fanuc type controls make sure your D offsets are correct.
Check your tool change position is adequate to clear every tool. A sub-programme is useful for storing this as you only need to get it right once. And don’t forget that the turret will spin around here. Make sure it can’t hit anything.
Remove long large tools if not in use.
Check that each tool calls its offset T0101 (Tool one offset one).
Clean all your screens make sure you have the best view possible.
Here’s A Thought
If your rapid is nice n slow even if you hit the part with the tool as it approaches the workpiece:
I probably won’t break the tool.
If it cuts the metal, so what.
You will have time to stop it.
You probably wont get fired.
Most controls have a check screen so use it
How we Teach Checking CNC Programs (Prove Out) at The CNC Training Centre
You might want to reduce spindle speed for the prove out it feels less stressful.
I don’t start the spindle until the tool gets to the workpiece. That way there is a lot less drama.
Set rapid override to minimum.
Set position screen so that you can see the distance to go or remain. You must be able to read the program (a printout may be useful).
You need to be able to view the modal G codes as well as spindle RPM. All controls will have a screen to show this along with loads more useful shit.
If you have a set-up key then use it. It will allow you to do more things such as opening the door at low RPM.
Check your manual to know exactly what you can and can’t do when you stop your program. This varies massively between machine tools.
Set your Optional Stop switch or button to on. If you have M01 before or after each tool then the machine will stop.
Set single block to on. This is a button or switch. This means for each block of code (line ending in ;), the machine will read it, do it and wait.
Single Block
If you try and prove out a program with single block off you will get to the end of a block and the machine will carry on.
This often causes operators to shit themselves as they are not ready for what ensues. Keep single block on and you will only have to worry about the block you are doing.
Sometime in a CNC program there is a load of bollocks going on in the background that you can’t see. Something like a tool change may be reading loads of blocks you can’t see and are of no interest to you.
A quick work around on this one is take the machine out of single block
Set rapid and feedrate overrides to zero. Press cycle start and just wait around for some shit to happen.
Look at your display and as soon a the machine shows a distance to go or starts to move press the feedhold button.
Now you can switch the single block on and proceed with your prove out.
Checking CNC Programs
So here we go…..
Rewind and Reset the program to the beginning. Best done in memory with rewind button.
Press cycle start as you look into the machine. Be ready to press Feed Hold or Program Stop button.
If your rapid is set nice and slow it’s OK to switch off single block until the machine starts to move. As soon as it does press Feed Hold and turn Single Block back on. This may be necessary if your tool change program (which is not normally visible) allows single block. This means just a tool change will require loads and loads of presses of the button.
Watch as the tool gets closer to the workpiece. Press feed hold when it is close to the workpiece. (It may stop before this).
Now read the program.
Look at the remaining distance to go. If this is a massive number it’s time to panic.
Now work through each block like this.
Stop the machine and look at the program. Read the position display. Start the machine while you’re looking inside with your finger ready to feed hold or E stop.
When you have completed the Prove Out run the program without single block but still keep the rapid nice and slow.
After a few parts you can put rapids up to maximum.
Video below shows how to use REWIND in Auto mode.
Remember when the machine is moving you should be watching not looking at the display. Only look at the display when the machine is stopped.
I could say good luck but I would never expect you to rely on luck. Be patient and follow the above and you wont need it. As Louis Pasteur said luck favors the prepared mind.
Thanks for reading this article and don’t forget the most important thing is your personal safety and the safety of others.
Save Offsets Siemens 828, I often see my job as a trainer as the bloke who works out what those odd buttons do. You know, the one you see every day but never dared press it because it might cause your machine to implode and completely destroy itself.
This is the chappie his name is Archive but he does other things other than what it says on his tin so to speak.
If you dare to press him you have the luxury of being able to save all your offset and tools related to your program and you will be blessed with special powers, a bit like Spiderman but without all those sticky bits of thread.
“How cool is that”
What you Do to Save Offsets Siemens 828
First of all you will need to be in Program Manager.
You should then be able to see this screen.
Now press the button.
You will now have the option to press
So go ahead press it.
From the dropdown boxes you can chose what you want to save.
Press OK and everything will be saved in a file which has the same name as your program flowed by TMZ. Not sure what that means but it contains all your shit.
So that’s good (Save Offsets Siemens 828) isn’t it?
It has the extension INI.
My program was FACEMILL so it added FAEMILL_TMZ.INI
So now it’s easy. When you want to recall this information just open the file (much like you open a program) and there it is.
Just click OK and your data is all reloaded.
Save this file with your program and everything you need is there. Don’t you just love that??
Ok sorry to shroud you in a cocoon of total bullshit.
It’s like Macro on a Fanuc Control. What you do is you program a circle and instead of putting numbers for the X values n stuff you put a Q number like Q1 or Q10
Then you tell it what the Q values are. So instead of X-20. you could have X+Q10
If you then went on to define Q10 as -20 then X would be X-20.
All will be revealed.
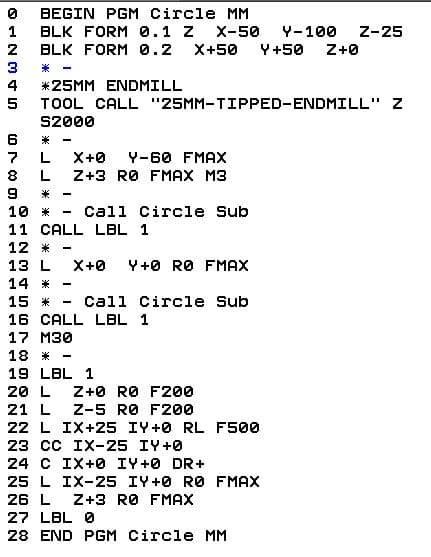
Take a look at this code.
Full Circle Heidenhain
This code will mill a full circle and because it’s in incremental (note the I in front of the X value) you can dump one anywhere. By that I mean you can mill one of these circles anywhere not take a shit anywhere.
Now watch it in action.
This is great but it is not easy to control. If we wanted a different diameter there are quite a few figures to change. If you are a bit of a prick like me then you’d probably get it wrong and scrap the part.
Q DEF To The Rescue Full Circle Heidenhain
Using Q def is really easy. You could start by using it to change the feedrate. Look at the code now.
Line 7 and line 17 define Q1 as two different values.
So when each one calls LBL 1 the feedrate in line 25 will change to whatever value is in Q1.
Heidenhain circular interpolation, mm what bullshit, this just means cutting in a circular move.
Very often wrongly called interpolation here is Wikipedia meaning.
Well that’s definitely confused me. But to me interpolation means movement.
Circular interpolation moving in a circular motion, full or part circle.
Linear interpolation moving in a straight line.
Heidenhain circular interpolation, there are four ways to produce a circular move on a Heidenhain control. You will love the flexibility of this control once you take the time to get to know it.
CNC Airfryer
Heidenhain is the Air-fryer of CNC controls, it does the lot and in many different ways. Now the healthy option is the one that suits your drawing and require the least amount of Maths.