Tool Length Offsets Beginners CNC
Category : Training
CNC Training Call David: 07834 858 407
30 Five Star Reviews


This article will explain all you need to know about tool length offsets and setting tool length offsets Fanuc
Ok so you managed to write a CNC Programme for your CNC Milling Machine, well done.

A CNC program is a set of instructions telling your CNC Machine exactly how to machine your component.
It contains all the necessary tool paths XY position and Z depths.
It also contains on off signals to do things like starting the spindle (M3 clockwise M4 counterclockwise).
The progam will have all the feeds and speeds for your tools. You may have performed a simulation using the graphics on your machine.

Lots of software like Edgecam can perform full collision detection. You have a model of every tool and it’s holder. There is full model of the machine and all the work-holding.

Edgecam will even tell you if the flute length of the tool is too short!
Ok so that is all great so far but when we put this program in the machine to run there are three things the machine doesn’t know.
Can you guess what they are?
No it doesn’t know jackpot winning lottery numbers (that would be four things it didn’t know).
-
It doesn’t know where the part is in the machine coordinate system.
-
It doesn’t know how long the tools are (tool length offsets).
-
It doesn’t know the diameter of the tools.
Vital information wouldn’t you say?
So first of all we use the Work Offsets to tell the machine where the part is.
Read this for more CNC Help if you want to learn how Work Offsets are used.
Please don’t worry if you don’t know how to do this after all this is beginners help with tool length offsets .
Your mates don’t know your reading it, you can tell them you already knew all this shit.

So in the picture above we would touch the spindle nose onto the Z datum of our work-piece. This would tell the machine where the part is in the Z axis.

This distance is input into our work offset table (in this case G54).
If we now program G0 G54 Z0 the spindle would rapid down to this position (G54 is where the values are stored).
We wouldn’t do this by the way cos the machine would crash.

Now The Tool Length
What we now need to do is take into account the length of the tool.
We would measure each tool length and store it in our tool length offsets file.
This tool length offsets file stays in the machine and is independent of your CNC Programs. So now any program can access this file.
So how does it do that?
It uses G43 and G43 says “ok get me a tool length offset”
G0 G43 Z3. H1
Which tool offset?? Well that’s the H number.
So the line above says to the machine rapid to Z3. Oh and by the way allow for the length of Tool 1 before you get there.
That’s the H1
So it gets the tool length from the tool length offsets file. It then does all the maths for you.
Actually it’s just a bit of simple arithmetic. Your (G54) work offset) minus your tool length.
Your tool will arrive 3mm above your component.
So whatever tool you called into the spindle with your M6 command you need to use the corresponding H number.
M6 T5 (Get tool 5 in the spindle)
G90 G0 G54 X0 Y0 S1500 M3 (Rapid to X0 Y0 and start the spindle)
G43 Z3. H5 (Rapid to Z3. but allow for the length of tool 5)
How do you measure the tools?

Well some people use a bit of paper!!!
And some buy one of these little babies.
“It’s just a light on a fuckin stick” I hear you say. But it’s so much more. I comes on at an exact distance above your part. And because it’s all spring loaded, if the tool carries on a bit it don’t bust anything.
Only cheap but do a great job.

And if your a very good boy you might get one of these for Christmas.

Auto tool measurement (yes it’s all done for you)
In the cases above we are storing the actual tool length in the offset file.
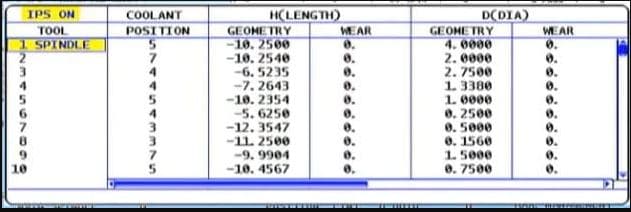
Now let’s take a look at that tool file again.
Some of my readers are very astute but before you start writing me an email or commenting on this article. “oh David it looks like you fucked up again”
I know……
Why are the tool lengths (Under Geometry) minus figures?
That’s because as always there are several ways to do this. What some people do (and I am not one of them) is……
They bring each tool down from zero return and touch on the part. This figure is then recorded in the tool length offsets file. And yes it’s a minus figure. Of course the G54 work offset would be zero in the case of Z.

Now I am not prepared to argue with you about this (your doctor told me not to). It’s just bad.
Maybe you might want to read this?
That figure has no relation to the actual tool length and you need to reset every tool for every Job!!
I’m saying no more I’ll just wait for the comments.
There is Only One Way
Actually there is something else to consider. (I know I
said I’m saying no more).
By setting your tool length the correct way (my way), the stored offset is the actual tool length and you can do a rough check with your steel ruler before proving your program.

Auto tool length measurement will always give actual tool length and so will a tool pre-setter. That means you can swap tools between machines.

A Few Other Things About Tool Length Offsets
If you have a Mazak. Mmmmm if you have a Mazak.
Well it’s easy. Mazak machines have active offsets so the minute you do a tool change and get your tool in the spindle the tool lengths offsets are active. They also nearly always have an auto tool measurement system
.Sorry if you are a Mazak user and you are thinking “this dozy bastard has made me read all this gratuitous shit for nothing”
Now’s the time to leave. Go on off you go.
Ok so what.
Mazaks also do this…….
When you write a G code type program for a Mazak you don’t need a G43 and you don’t need the H
M6 T5 (Get tool 5 in the spindle)
G90 G0 G54 X0 Y0 S1500 M3 (Rapid to X0 Y0 and start the spindle)
Z3. (Rapid to Z3. but allow for the length of tool 5)
Forget the G43 H5 shit…. soooo easy.
Those Mazak guys just don’t believe in stating the obvious and wasting your precious finger tips typing in a load of bollocks that the machine should know anyway.
Just remember you can change this by parameter if you want it to work the same way as your Fanuc or your Haas. Oh and you don’t care about increasing your carbon footprint with those extra finger presses.

That way you can put programs from your Fanuc into your Mazak and vice versa.
One other thing

Haas have a little trick up their sleeve.
You can alter the settings on a Haas machine so that if your H and your T are not the same you get an alarm.
M6 T5
G90 G0 G54 X0 Y0 S1500 M3
G43 Z3. H1
Remember our program. If you changed the tool number but forgot to change the H you would be using the length of T1 for T5

Yes you just bent your machine.
Of course if it’s a Haas you just get an alarm.
Learn all this and more
6 Comments
Vijay Kumar Verma
March 2, 2021 at 3:58 pmI want use one tool with various length offset like To1 use with H1, H23, or H25 offset can it possible in Fanuc control?
David
March 4, 2021 at 11:18 amYes you can do that but use H numbers higher than the number of tools you have. That way you will avoid errors.
If you have 30 tools then start from H31 or you could add 30 to the tool number.
For eaxmple tool 1 would use H31.
Hope this helps.
Rob
April 6, 2021 at 2:38 amGood and entertaining read David, thanks. Does a normal single contact taper sit at the same depth in the machine spindle as a presetter? I currently use paper method but interested in a presetter. Perhaps I need to check my arbors are to correct ISO size beforehand.
David
April 8, 2021 at 9:41 amNot quite sure what you mean there Rob. Email me via contact form and I will help you. Thanks, David
Roshan
May 19, 2021 at 4:11 pmThanks David for ur wounderful blog… I can’t afford an Institute bt with you guys around, don’t need one…
David
May 19, 2021 at 5:08 pmThanks Rosham