Author Archives: David

Full Circle Macro Program on a Fanuc Type Control

Category : Fanuc Haas

Full Circle Macro

When we program G2 and G3 on a Fanuc type control an end point is required and a radius.

Full Circle

The control can then miraculously fit in the circular move. Sometimes on training course my students have read stuff on the Internet about I J and K.

My stock answer is unless you are working on a really old machine and I mean dog shit old you wont need it.

Towards the end of the programming course I admit to lying and drop the bombshell that maybe they do need to know just a little bit about I J and K.

Full Circle

Look at this article if you want to know what it is right now.

Anyway you can actually live your whole life and never worry your pretty little head with such crap as I J and K.

My mother is 96 and if you ask her about I J and K values she would not have a clue what you are on about.

What about a full circle? your smart arsed friend will ask.

Easy you program it in two halves.

Actually I think it is a bit of a cop out because there is a very easy way. I’m not explaining it again cos its in this article. Oh and it’s piss easy.

Piss can be used in many contexts.

In England if your mate is pissed it means he is intoxicated. In America I believe it means he is unhappy.

To say “I can piss it” means I can do it without any effort.

“Piss easy” means easy like taking a piss (urinating for the posh engineers)

“Piss fit” means a loose fit (Engineering technical term).

“It pisses in” means it goes in with ease

“Piss off” means go away.

“On the piss” means out drinking with friends.

Can also be called “out on the piss”

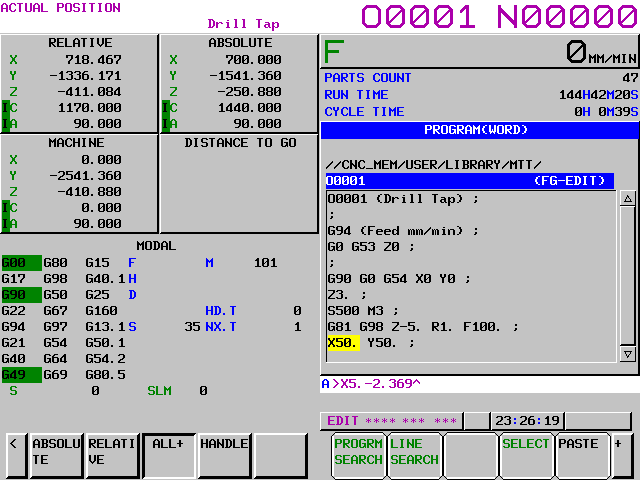
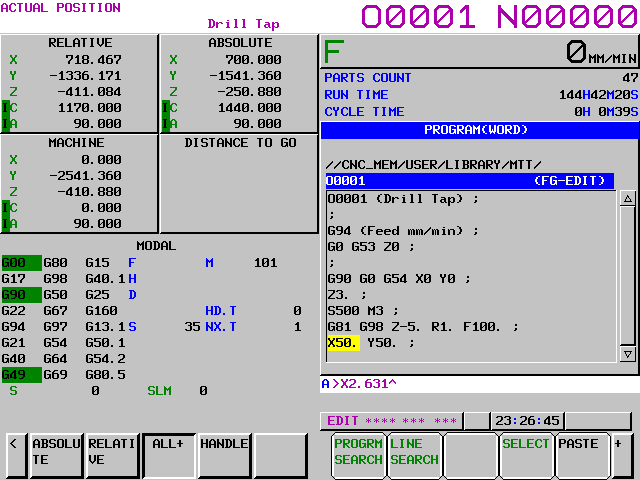
Anyway this program is a macro you can use to easily program a circle of any size in cutter compensation.

Full Circle


In the above main program the tool radius is stated as D17 and #1 is the required radius. #2 is the depth.

Now take a look in the subprogram.

Full Circle

Full Circle Macro

Firstly it swaps to incremental so you you can dig this hole wherever you want in your garden just say where.

It feeds to the Z depth you told it in #2.

Then it applies cutter compensation (you gave it the D offset in the main program).

Then the G3 tells it to mill a full counter clockwise circle .

Hey don’t forget the G1 on this line G1 G40 X-#1. You will get a nasty little alarm if you don’t you naughty boy.

This just cancels the compensation and goes back to the middle.

Then the G90 to swap you back to absolute (keep the place tidy your mom doesn’t work here)

Her is a nice video of the whole thing. Don’t you just love Vericut.

Watch the program step through to give you a full explanation of what’s going on.

Full Circle Macro

Hope you like my Macro. If you use it then keep updating it and making it better. Send me a copy when you perfect it.

A Note

In macro programs it’s the stuff you leave out that counts. What I mean by that is that the more you leave out of the macro program the more you can control externally.

If the feed-rate and D offset were in the macro program you would be stuck with them whenever you use this macro. Think about it.

It’s like my mother in-law without a divorce Im just stuck with her.

Here is how macro type programming is done on a Siemens control

If you want to learn about rads and chamfers on a Sinumeric Siemens 840D read this

Thanks

If you have been affected by any of the issues in this post or need CNC Counselling then contact me.

If you want to learn to program CNC Milling Machines

Look no further Contact CNC Training Centre


Program Restart Fanuc Not Scary At All

Category : Fanuc

Program Restart historically people tend to avoid Program Restart on a Fanuc control. It is an option so again don’t get too excited as you may not have it.

Program Restart

I remember using it years ago on 6MB controls circa 1982 and it was like performing black magic. What a rigmarole and it took me ages to figure out how it worked.

Oh yea and you could only perform it when there was a full moon or an R in the month.

Anyway recently I came across it on a new Hartford Machine I was training on and couldn’t resist getting it going.

Program RestartSo now I am going to share Program Restart with you.

Now I am always banging on about not putting too many N numbers in your programs (they can make you hyperactive).

Anyway you need an N number in order to perform a program restart on a Fanuc control.

Now if you had a load of holes to drill and tap you might want to number them all just in case you need start half way through having broken a drill or tap.

In this program I used an N number for each hole.

Alternatively you could wait till you need to do a program restart and just add an N number where you want to restart the program. In this case it’s N1234

Word of Caution Program Restart

Most tool changers use a 9000 series program for the tool change. There may be N Numbers in here. So if you end up stopped in this program it will normally be a low N number. Therefore I tend to use 100 series numbers N100 onwards.

Here’s What You do for a Program Restart

  1. Reset the program at the head you can use REWIND if you want.
  2. Turn on Program Restart this will be a switch or a soft key depending on the machine control.
  3. Input the N number you wish to start at eg N100.
  4. Press Q-TYPE the machine will jump to this line and the following screen will show.Program Restart
  5. Your sequence number is searched for and this screen will show you where your machine is going Program Restart  and the Program Restart
  6. Turn off Program Restart. (Distance to go will flash)
  7. Go to MDI and get the correct tool then start the spindle at the correct speed. Issue M8 if you need coolant on. (The tool number and recent M codes are all shown on the screen above)
  8. Go back to AUTO or MEMORY mode.
  9. With the machine in SINGLE BLOCK each time you press cycle start the axis will move to position in the order shown on the screen. Use feed controller to position axis.

Program Restart

10. You are allowed to manually move the axis before continuing if a collision is suspected.

11. Once each axis is in its final position the program runs normally from this point.

Advice (Program Restart)

If you got it use it.

Oh and keep using it.

It will become simple.

Confession

I’d forgotten about this and it’s definitely not as scary as I remembered. Maybe I got smarter in my old age.

It is a very underused function if I had a machine with it on it would definitely be in my digital toolbox.

You Can really Impress the Boss With this One

Fetch him over for a demo but make sure you know what you are doing first just in case you fuck it up.

If you have been affected by any of the issues in this post or need CNC Counselling then contact me.

If you want to learn to program CNC Milling Machines

Look no further Contact CNC Training Centre


How G28 Works. Why two pushes of CYCLE START?

How G28 Works

Every wondered why G28 takes two presses of the CYCLE START Button when you are in single block.

How G28 Works

Be amazed you are about to find out.

One of my pet hates, and at my age you have thousands, is when people say

“Oh I don’t know we’ve always done it”

I just think, well you are stood at this machine for eight hours a day why not find out what’s going on.

How G28 Works

How G28 Works

G28 tells the machine to return to its home position. This is usually a convenient point for a tool change.

The command on a machining centre looks a bit strange.

G28 G91 X0 Y0 Z0

Why G91?

Well G28 means return to your home position via an intermediate point.

So if you programmed G28 X0 Y0 Z0 then your machine would rapid down to the workpiece (probably crash) and then go to it’s home position.

What G28 G91 X0 Y0 Z0 tells the machine is this……

  • The reference point is incrementally zero from where you are.
  • So the machine does not move.
  • Then it goes to it’s home position.
  • Hence the two presses of cycle start.

On a CNC Lathe we use U and W for incremental. Read this post if you don’t know.

So if you programmed G28 U0 W0 your X and Z axis would return to their home position. This being because the reference point is incremental.

If you programmed G28 X0 Z0 you would probably get a collision like below.

Well at least it went home.

First move is to X0 Z0 which is the front of the part. (This is your reference point.)

The machine would then move back to zero return.

G28 is fine on a CNC Lathe but on a CNC Machining Centre you must remember to change back to G90 (Absolute).

My preference is to use G53 to get back to your home position.

Read this article if you never heard of G53.

Please note some older machines don’t have G53. Oh and it is classed as an option!

If you are affected by any of the issues raised in this post or need CNC Training then contact us.

Contact CNC Training Centre

Don’t forget to watch my Tutorial Videos

We offer training on all types of CNC Machines and controls check em out.

Or fill out the contact form below


Fanuc Calculator Using the CALC ALTER Key

Category : Fanuc

Fanuc Calculator, did you realize you had a calculator on your Fanuc control?

On the Fanuc Oi control this is what you do to use the calculator.

Just check the buttons before you get too excited you might not have it.

Your ALTER key should look like this.

Fanuc Calculator

First of all input your calculation which can be part of your X, Y or Z figures.

Fanuc Calculator

So if I wanted to subtract 2.369 from my X value of 5 then I just input it.

Fanuc Calculator

Now press your SHIFT key (mines a bit bent).

Fanuc Calculator

Then press the CALC/ALTER Key

Fanuc Calculator

Voila, down in the buffer you magically get your answer.

Fanuc Calculator

(The next bit is boring but read on cos there’s more on the calculator)

History Lesson

If you are an old codger like me you may remember FANUC FAPT. It was an early attempt by FANUC to create an automatic programming system. It was actually pretty damn good at the time.

Well I got trained by this Japanese guy it was in the days where we were genuinely worried about exploiting Japanese workers. Oh how the times have changed.

This guy didn’t speak very good English (but then neither do I). He did a great job of training me but one thing sticks in my mind.

He insisted that I always input exactly what was on the drawing.

Don’t Add Em Up Stupid

If a drawing had two lengths say 12.6 and 13.4 he wouldn’t let me add them together. I had to input 12.6+13.4 into the computer.

It really makes sense because humans are shit at adding up numbers but computers are great at it. It’s in their DNA. We are much better at getting pissed and eating chips.

Yes you could put in the wrong numbers but at least you’re not adding them up as well and messing that up you stupid boy.

Fanuc Calculator

You can even do calculations on two or three axis at once look at the example below.

Fanuc Calculator

Fanuc Calculator

Fanuc Calculator

Down in the buffer you get your answer ready to use.

Fanuc Calculator

Fanuc Calculator

To use it as a regular calculator, type in as below.

Fanuc Calculator

Same again for the answer

Press your SHIFT key.

Press the ALTER Key

Fanuc Calculator

Fanuc Calculator

Fanuc Calculator, oh and guess what?

You can even do simple triangle calculation (you know all that trigonometry shit.)

Yes you know the score now SHIFT then the ALTER key

How exciting is that, you might have to get rid of some of those extra numbers but you get it now.

If you need training or have been affected by any of the issues in this article please contact us.


Step Through All Fanuc Programs

Category : Fanuc Mill Fanuc Turn

Step Through All Fanuc Programs

In the edit mode if you type letter O then press your lower cursor you can step through all the programs in the machine.

This was really useful in the old days (for old gits like me) because there was no directory screen on the old Fanuc 6M control.

But it still works.

Heidenhain Training


Careers in CNC

View all current vacancies in CNC

Click here

Call David: 07834 858 407