So if you got into the habit of using G94 Facing Cycle CNC Turning.
When you want to add more cuts it’s easy, piss easy.
So if this blank had 3mm on the face it’s really easy to add some more cuts.
G94 Facing Cycle CNC Turning
Oh just one other thing
This cycle is modal. Notice how all we did was add some Z figures and it just did the facing.
Well just like your wife when you got drunk 15 years ago and urinated in the bed. Well……
It remembers.
So that means we need to stop it. Just by adding a rapid command G0 or G00. It stops. It forgets.
Oh and don’t try n space the code out here because if you leave an extra block in it will face the part again.
I think I need to be honest with you here and confess that until recently I have never seen the point of this G94 code. But now I have seen the error of my ways and I think this demonstrates just how useful it can be.
Now I know some smart prick will say “Oh well I just use G71” . Yes that’s fine but don’t you think it is rather complicated just to face the front off a part that’s too fuckin long?
So when we turn on the machine we would need to zero return the machine. What is Zero Return you ask?
Well when you switch on the machine it’s a bit like when you wake up the next day after drinking a whole bottle of whisky.
First thing you think is where am I? Then the memories flood back of how you were dancing naked on the bar.
A CNC machine is much the same (except they don’t piss in a complete strangers cupboard). So you need to let the machine know where it is.
We move the machine back to it’s zero position and on the way it triggers a dog which is like passing over a button. This tells the machine where it is.
You’ll notice it slows down as it passes over this dog. That gives it time to sort itself out.
No dogs were harmed to create this post
Not a real dog you turkey that would be cruel I mean a switch.
You only need do this when you first turn on the machine. After that the machine always knows where it is.
Jog
Jog what’s Jog? Well in this mode you will have an X Y and Z buttons.
This determines how fast your axis will move when you press X Y or Z in the plus or minus direction.
This very often has a rapid button that you can hold in to make the moves really fast if you really want to shit yourself.
So you can use this to move your axis around. You could even use it to drill a hole or face mill a part.
CNC Help Hand wheel
When you use the hand wheel you would normally be required to select an axis and an increment as below.
If you selected the X axis and an increment of 0.1 then each click of the hand wheel will move the X axis 0.1mm.
The hand wheel always reminds me of the robbers cracking the safe in the old movies.
Again you can use the handwheel much like jog to get the machine in the position you want and maybe drill a hole or something.
Haas handwheels have a really course setting like 1mm a click so beware!! But it’s great for quickly getting around the machines.
Also beware of over-run, because some Haas Toolroom Machines will carry on after you finished turning the hand wheel!!! Holy shit batman.
Just remember that these articles are designed as general guidelines as machines will vary.
If you use the analogy of driving a car then it’s like borrowing your mates car. It will definitely have lights and indicators. You just got to find where the switches and buttons are.
Got this off ebay only 5000 quid
Incremental Jog
Just thought I’d add this in. Some machines have an incremental jog and I suppose it’s a bit of a combination between handwheel and jog.
You select an increment and each time you press the axis button (XYZ) the machine feeds that amount.
Very useful for clocking in bores and stuff like that. Personally I like the idea and if I worked on a machine with this I’d be using it.
It’s important to remember that handwheel and jog can usually be used with the door of the machine open. They may seem gentle and there’s not much noise going on.
Please note you are using the full power of the machine and if your hand is in the way the handwheel will not stop.
MDI
Remember that these modes may have slightly different names but all CNC machines will have them.
Like on some Siemens controls MDI is called MDA (don’t google that one!!!)
Manual Data Input (I suppose it’s kind of self explanatory).
It’s just a way of writing little short bits of CNC code and it’s normally automatically deleted after use.
You could use this for things like doing a tool change or starting the spindle.
Almost anything that you would put in a program can be done in MDI.
It is usually used once and thrown away, not really environmentally friendly single use program.
Most controls have a way of converting this MDI program into a permanent one to keep in memory. Fanuc uses program O0000 for MDI and it’s a bit like a clipboard. You can change this program O0000 to a real program number like O0001.
Some operators only use MDI for tool changes so you might want to keep the code there for whenever you need it.
Moan Moan Moan
On a Fanuc control you have to put an EOB (end of block or semicolon) at the end of the line of code to make it work. Otherwise you get an alarm. Drives me bonkers.
Digital punishment
Memory/Auto/Full Run
This mode can have different names but it’s the mode where you get to run your programme.
After selecting the programme you want to use select this mode.
When you press cycle start the programme will run.
And that red button at the side there is feed hold, it will halt the programme movement but it won’t usually stop the spindle from rotating.
Drip Feed/Tape
This mode is usually for running direct from a Memory Card or PC and it varies from machine to machine. Some will run direct from a floppy disc.
It is for those massive programs too big for the machine memory. Some really old machines will even run a paper tape.
Drip feed is a bit like lying under a beer tap and slowly getting pissed.
Anyway you don’t need to worry your pretty little head about that one at the moment.
Picture of a floppy disc for our younger viewers.
Let’s get on to the interesting shit.
CNC Help Edit
Edit well it’s kinda when you edit….
Yes it’s when you alter the program. In the edit mode you can look at any of your programs stored in your machine and Edit them.
There are massive differences in what you can do depending on your CNC control. Don’t get me started on this one cos I think CNC Machines have been in the stone age on this one for years. Now I’m not going to mention names but even simple things like copying programs can be an absolute piece of shit.
So if your used to the power of editing on a PC get ready to go back in time. Most new machines are pretty good on this now but it’s taken a long time and I still find it really convoluted and counter intuitive. (I don’t know what either of those words mean).
Here is a short video on how to copy and paste on a Fanuc 18i it’s very similar on most oldish Fanuc controls. (Excuse the long intro on the video but I am trying to flog records as well here).
Editing in its simplest form is INSERT ALTER and DELETE.
These are self explanatory but I have put a nice little gif above just to hold your attention.
Most modern controls will have FIND and REPLACE. It is well worth learning to use this because it guarantees that you don’t miss any figures in your programme.
Like if you had X57.65 in your program six times if you use FIND/REPLACE to change em all to X57.66.
You are sure to catch them all and you can be sure they are all accurate. Even if you altered em to the wrong figure at least they will all be the same.
This article CNC beginners guide, is about Single Block and how it is used.
When you write a CNC programme it will consist of blocks of programme.
What is meant by a block?
Well it’s everything until the control sees a semicolon ;
If your not sure what a semi colon is it’s when you have had an operation to remove half your large intestine.
The semicolon is called an end of block or EOB
Try not to confuse this with a line of code.
Depending on how your screen is set out a block could be more than one line. The control reads everything until it sees the semicolon or EOB (End of block).
In most cases and on most controls it does not matter what order the code is in. The main reason to follow a set pattern for your code is to make it easy to read.
Try to always put things in the same order.
In one block of code you can have loads of stuff.
You could write:
G0 X50. Y50. S1500 M3;
But if you wanted you could put the S1500 M3 on a different line.
When doing this, think about why you might want to do it. For example you may want to get the tool ready to use before switching on the spindle or the coolant. This saves the excitement of the spindle whizzing round when proving the programme.
Oh yes and you could get fuckin soaked.
Most of this applies when you first test your programme. This is when we use single block.
The Switch
To run a programme in Single Block we have to throw a switch.
This can be a normal Single Block switch or a button or a soft key. Read the article below to learn how to prove out your CNC programme in Single block.
Once single block is enable the machine will do exactly what it says on the tin.
It will run that block and wait for its next command like a good doggy.
The beauty of this is you only need to think about one block.
Now I don’t want to appear sexist at this point but I recon if my wife were a CNC Operator she wouldn’t need single block. Not only can she do two things at once, which I can’t, but my wife also has an uncanny knack of knowing what’s going to happen next too.
For those with no extrasensory powers just switch on the fuckin single block.
If you turn single block off the machine will still stop at the end of it’s current block and wait for another press of the CYCLE START button to carry on.
Also when you first turn single block on it will stop at the end of the block it is executing.
Those of you who read my articles will know that I love these old Matsuura machines (they make me feel young again).
You know when you’re getting old when you keep asking complete strangers “how old do you think I am”
I did it in Barwell the other day. The woman in the Coop said “piss off you silly old bastard”
What No Telly Screen
Anyway these machines have a one line display so you have to step through to read each line. You can only see little bits of code.
I once input a whole programme into one of these controls not realising I had no end of blocks .
(From now on I ‘m not saying fuck in my articles, I will refer to it as the F word like these posh people on the telly)
On this occasion I said the F word after taking about an hour trying to realise why the programme wouldn’t work.
You can even make this with non alcoholic Gin. Yes it’s true (non alcoholic gin) my wife bought a bottle the other day. Now I happily went along with this scenario till I found out it was fourteen quid a fuckin bottle.
Absolutely no way, no hang over, no phone call from your mate saying you shit in his cat tray. No no none of that, honestly I give up.
Let’s continue with this CNC beginners guide to CNC programming.
In one block of CNC code you can only have G codes that belong to the same group. I’ll tell you about this in another article when I can be bothered to do it. Anyway it’s easy, they can’t argue with one another. You can’t put G1 and G0 on the same line for example because they are in the same group.
You can’t say feed and rapid in the same line. That would be stupid.
Obviously you can’t repeat things like having two speeds in the same block.
G0 S1200 X50. Y50. S2000;
I don’t think anyone who reads my articles is that stupid….. Except for that bloke in Bolton, but I think he took up plumbing in the end.
Your tool change M06 is probably aliased to a macro. This means that a programme is running in the background that you can’t see. Single block may well be inhibited. This means one press of the CYCLE START button will do the tool change. Sometimes however single block works. In this case it will take loads of presses to get through the tool change. Just be patient.
This is the sort of thing that’s running in the background.
I won’t go too much into this, after all it is a CNC beginners guide.
Canned cycles depend on parameter settings. It will normally be one press to rapid to the tool down. Then one press to drill the hole. It may or may not need another press to bring the drill out of the hole.
The exception is G84 Tapping Cycle. You definitely wouldn’t want single block to work on this. Imagine the tap gets to the bottom of the hole and sits there waiting for a push of the button.
Sometimes feedhold is inhibited too in a canned cycle.
G76 threading start point, when you use a G76 threading cycle on a CNC Lathe the position that you start the tool at is really important.
This is the position you rapid the tool to just before you call the G76 threading cycle.
For example how does the control know if you are producing an internal thread or an external thread.
Actually I learnt this the hard way. It was on an old machine.
Maybe not that old. Anyway I couldn’t get it to perform a G76 threading cycle. It was cutting an external thread but the tool was working it’s way outwards.
What to do Next?
Everything rushed through my head, senile dementia, flashbacks from a misspent youth, did I feed the dog?
Anyway I suddenly realised I didn’t have a dog and that the start position of the tool was wrong.
G76 threading start point how was it wrong?
Well that’s how the machine knows whether you want an internal or external thread. Your start point needs to be inside or outside the thread. What a fuckin dipstick I was.
I had the tool just below the external diameter of the thread. If you do this the machine thinks the thread is internal and therefore cuts outwards.
Correct
So providing the tool is initially placed outside of the maximum diameter it will do exactly what you want.
Incorrect
Put it here and you are in deep shit. The tool will work from this position backwards and you will be totally confused.
So be careful because you might not notice that tiny amount.
Of course if you have a Siemens control Sinumerik 828 840D then this does not apply because you have to specify if the thread is internal or external in the cycle.
Front Clearance (G76 threading start point)
Now let’s think about how far in front of the part you need to be with the threading tool.
Maybe you never thought about it?
Well now’s the time.
Spare a thought for people like me who lie awake at night ruminating about these things. If you don’t know what ruminating means then maybe you shouldn’t be reading this article. Or maybe you just like the pictures.
This is my puppy his name is Donald he is learning to programme a G71 woofing cycle.
Now I need to feed at 6000 mm per minute so this pitch problem will be twice as bad.
Can you see where this is going?
Eat more fish.
No not really, well it is good for you but it’s not what I meant.
The faster you go and the courser your thread pitch the quicker the machine will have to feed.
If you have a coarse pitch thread in aluminium you probably will end up with a super high feed-rate your machine can’t even achieve.
This will all depend on the age of your machine but you must always make this calculation just in case you are trying to cut a thread at the speed of light.
G76 threading start point in Z Axis
This start point distance is really important because it will allow the machine to get up to speed.
I can’t give you exact figures for this, not because I can’t be arsed but because it will vary depending on your machine.
The machine will have a maximum feedrate and it will be in the manual.
You know that old book that you use to prop the door open.
The bigger you make this Z figure the more time your machine will have to get up to speed.
So don’t forget if you are starting at Z1. then the poor old machine doesn’t have much time to get up to speed.
Thanks for watching and reading
If you have been affected by any of the issues in this post or need CNC Counselling then contact me.
Well Set Out CNC Code is really important. It can save lots of time spent trawling through code trying to find the section you’re looking for. Simple things like leaving gaps after the tool change line can really help.
The program runs exactly the same but……
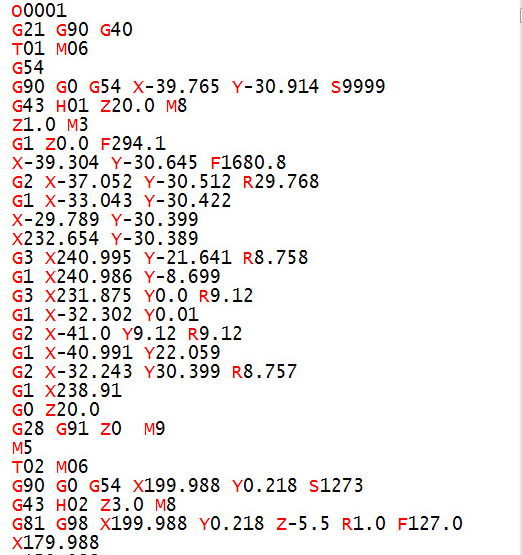
Look at the two examples of the same program
Well Set-Out
Uncluttered CNC Code
Not Well Set-Out
Cluttered CNC Code
Notice where the gaps are.
They give clarity to what’s happening in your program.
Try to create your own convention and always lay your program out in the same way.
Notice how your eyes are drawn to the tool change lines. These are usually the first things you are looking for.
Read On
It’s like reading a book without paragraphs, and page numbers. It also makes it easy to spot mistakes with well set out CNC code.
Dog reading a book
This is my dog, his name s “Get Back Here You Bastard”
See if you can find the simple error in the well set out code and let me know what it is. That way I will know you’re concentrating.
Clue: if you are the fortunate owner of a Haas machine it will spot this for you and alarm out.
Insert meaningful comments. Remember you might not see this code for two years and you won’t remember what you did or how you were thinking at the time.
When you eventually come back to this code you’ll be scratching your arse for hours trying to figure it out.
You’ll think:
“Why the fuck did I do that”
A little comment will explain everything
An Elephant and my wife never forget
Come on Get a Grip
Yes you will figure it out eventually but that’s the same with the human genome project.
It takes time to remember what you were doing
Why do I need Well Set Out CNC Code (Things To Do)
Leave gaps at strategic points in the program.
Loads and loads of comments, write them as you would say it, (don’t try to be posh).
Make the tool change lines stand out these are the key points.
Use N numbers at strategic points so that you can easily find things.
Don’t use too many N numbers or you will get confused they are like E numbers they can drive you crazy. They also take up loads of memory.
The machine setter and operator are your customers and you need to make their lives as easy as possible. Give em code that’s easy to read.
If your writing X50. Y50. Z50. don’t write Z50. Y50. X50. Yes it will run OK trouble is it’s bloody confusing.
Someone suggested adding M01 after each tool so I’m adding this in. (Thanks Michael)
An M1 or M01 is an optional stop which means you have the choice to stop at each tool. (Very useful if you want to stop at the next tool and you can’t stand around.)
Continuity
When you arrange the program in the same way every time it will be easy to spot mistakes. If you always put your spindle start and speed at the end of the first position line like this.
G90 G0 G54 X50. Y50. S1500 M03
Were you to miss out the speed you would have a very good chance of noticing it because the line will look wrong.
G90 G0 G54 X50. Y50. M03
Tidy neat code is the same as a neat tidy workshop. It’s much easier to find things.


